You are looking at the user documentation for the most recent master branch of RepoSense (not released to the public yet).
The documentation for the latest public release is here.
User guide
Welcome to the RepoSense user guide. This user guide takes you through a three-step approach to adopting RepoSense for your own use.
In case you missed it, the overview of RepoSense is given below.
RepoSense overview
RepoSense can generate interactive visualizations of programmer activities, even across multiple repositories. It's ideal for educators and managers to get insights into the programming activities of their mentees. The visualizations can be easily shared with others (e.g., as an online dashboard), and updating the visualizations periodically can be automated.
Some example insights RepoSense can provide:
- Which part of the code was written by Tom? How many lines? How many files?
- Which test cases were written by Kim?
- Which commit messages were written by Serene?
- Which portion of Jacob's code is documentation?
- Who hasn't written any test code yet?
- Which project did Jolene contribute to in the last month?
- Who is putting in the consistent effort?
- Who waits till the deadline to do the work?
- Who hasn't started any work yet?
- Which programmers/teams are falling behind?
- How does everyone compare in their front-end coding work over the past two weeks?
- Who are the the top 10 code contributors?
Report: We use the term report to refer to the web-based visualization generated by RepoSense. You can also think of it as a dashboard.
1 Explore real-life examples
If still not entirely sure if RepoSense matches your needs, you can use the examples of real-life RepoSense reports given below to get some sense of what visualizations it produces.
A showcase of RepoSense reports
Showcase
Case 1: Monitoring student programmers (individual projects)
-
Scenario: RepoSense is used to monitor a Software Engineering course in which students build a project over 8 weeks.
-
Links: report | repo containing the settings
-
Example usages:
Case 2: Monitoring student programmers (team projects)
-
Scenario: Similar to case 1 above, but this time students are doing team projects.
-
Example usages:
- To find the breakdown of the work done, we can tick the
breakdown by file typecheckbox, as shown in this view. After that, we can filter out certain file types by un-ticking the file type. - To find how teams compare in terms of total work done, we can tick the
merge groupcheck-box and sort groups byContribution, as seen in this view. Also, note how i.e., each ramp represents the work done by the entire team in the whole weekthegranularityof the ramps is set toWeekto reduce clutter. - This view shows the activities near the submission deadline (note how some have overshot the deadline and some others show a frenzy of activities very near to the deadline).
- To find the breakdown of the work done, we can tick the
Case 3: Monitoring student programmers (multiple external projects)
-
Scenario: Similar to cases 1 and 2 above, but this time, each student works on multiple projects. Furthermore, most projects are external OSS projects, not within the control of the teacher.
-
Example usages:
- This view shows the commit messages written by a specific student.
- Note how we can use the
group bydrop-down to organize activities around projects or individual authors. - Similarly, we can use the
merge all groupscheck-box to see the sum of activities in a specific project or by a specific student.
As you explore the above examples, you can refer to the following section to learn how to read and interact with those reports.
Using reports
Using reports
Let's look at how to view, interpret, and interact with a RepoSense report.
Viewing the report
As a report consists of web pages, it can be viewed using a Web Browser. Here are the ways to view the report in different situations.
- Situation 1: The report has been hosted on a website
- Simply go to the URL of the report (example) in your browser.
- Situation 2: You generated the report in your computer earlier
- Run RepoSense with the
--viewoption:
Format:java -jar RepoSense.jar --view REPORT_FOLDER
e.g.,java -jar RepoSense.jar --view ./myReport/reposense-report
- Run RepoSense with the
- Situation 3: The report was given to you as a zip file or as a folder
- If it is a zip file, unzip it.
- Open the
index.html(in the unzipped report directory) using a browser. - If the report was not loaded automatically, click on the
choose filebutton in the shown web page, and select thearchive.zip(in the same directory) manually.
If even thechoose filebutton is not showing up, try a different browser.
Report structure
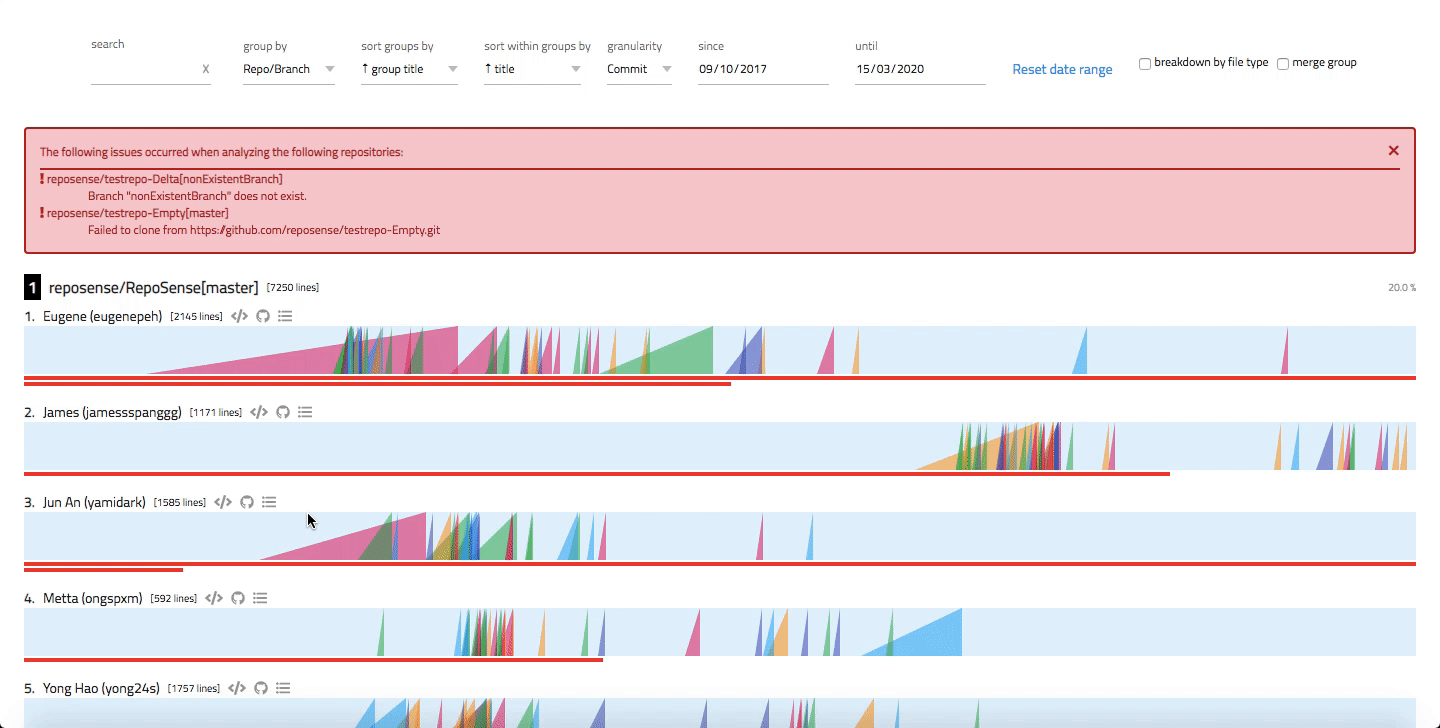
Here is an example of how a typical report looks like:
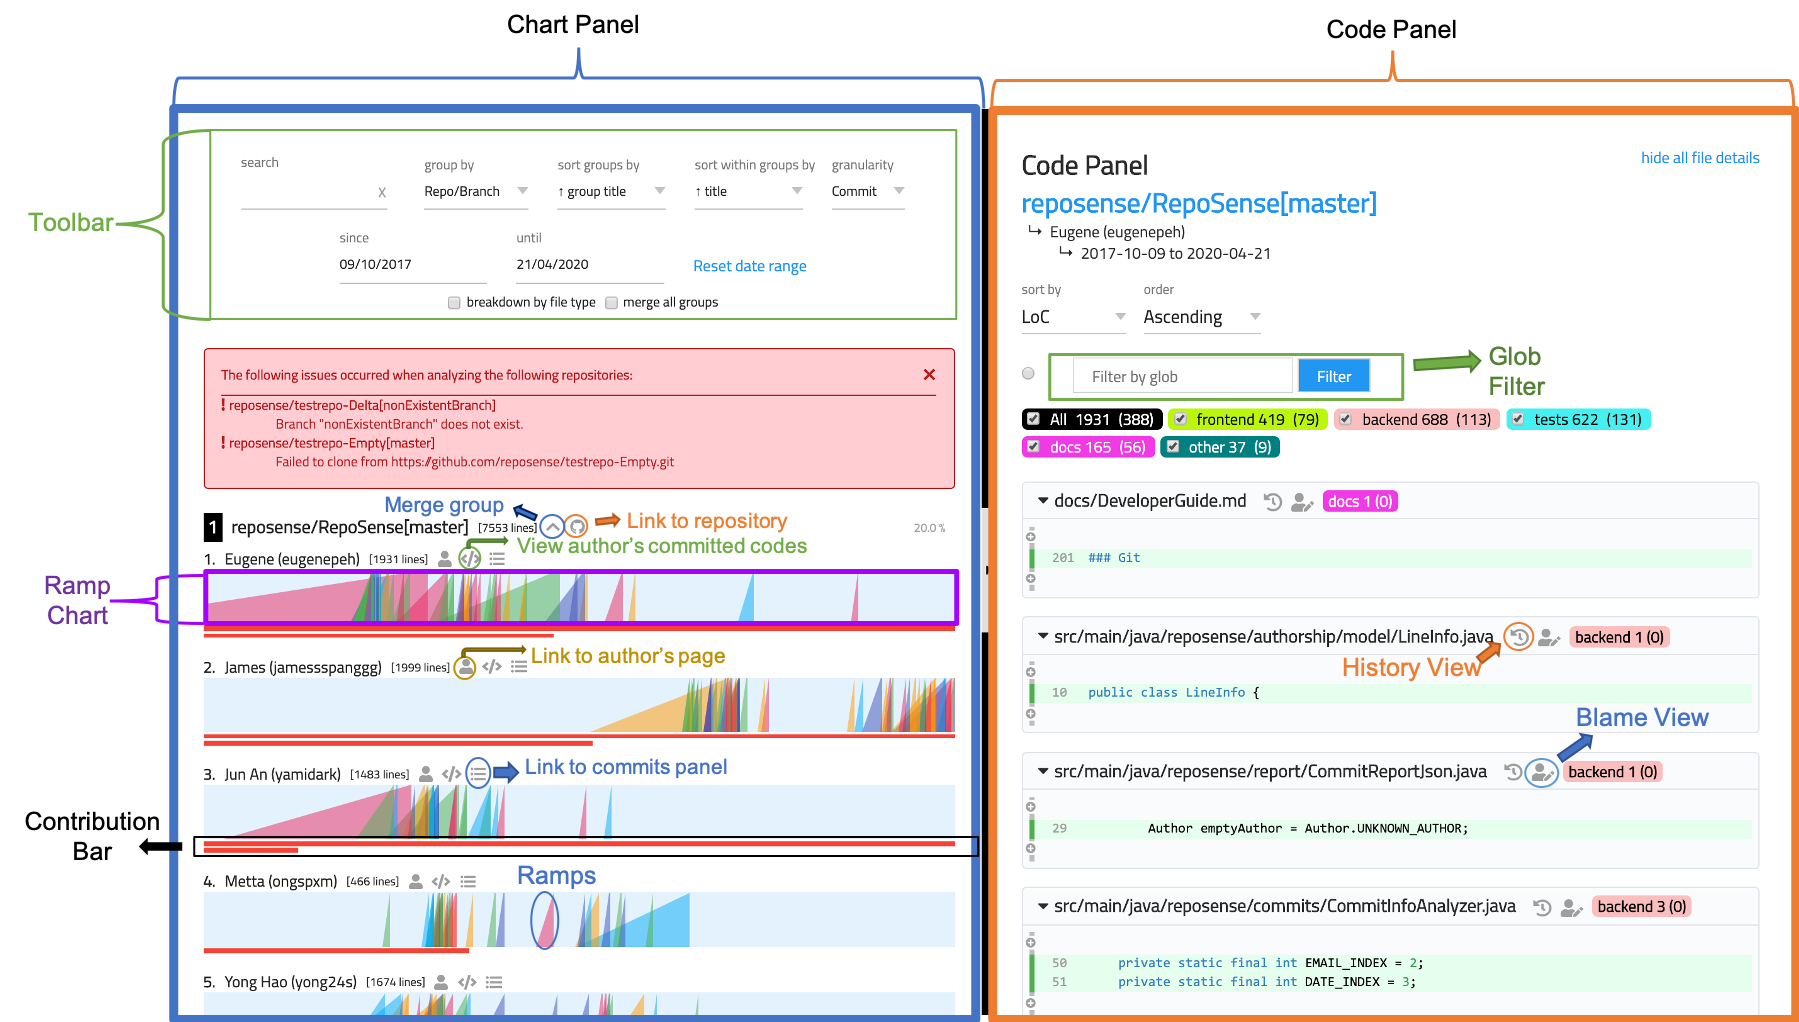
The report is divided into two sections: Chart panel and the Code panel. In some situations, the Commits panel will appear in place of the code panel. All three are explained in the sections below.
Chart panel
The Chart panel (an example is shown above) contains a series of ramp chart + contribution bar pairs, possibly organized into sub-groups, with a tool bar at the top.
Ramp charts
Ramp chart: This is a visualization of the frequency and quantity of contributions of an author for a specific repository. Each ramp chart (i.e., light blue rectangle) represents an author's contribution timeline for a particular repository. Contributions appear as ramps in the timeline.
Ramp: The name we use to refer to the triangular saw-tooth-like shape that represents a code contribution. A ramp can represent a single commit, a sum of the commits done in a certain period, depending on the granularity used.
- The ramp's area is proportional to the amount of contribution the author made at that time period.
- The position of the right edge of the ramp (perpendicular to the blue bar) represents the period (the day or the week) in which the contribution was made.
- Hover the pointer over a ramp to see the total number of lines represented by that ramp.
- Click on the ramp to see on GitHub the list of commits represented by that ramp.
- To make the comparison between two authors easier, the color of the ramps that represent different authors' contributions at the same time period are the same.
- Ramps representing big contributions can overlap with earlier time periods. This represents the possibility that if the work committed during a specific period is big, it could have started at an earlier time period.
Contribution bars
Contribution bar: It's the bar that appears below each ramp chart. Its length represents the total amount of code contributed by an author during the total analysis period.
- Hover over a contribution bar to see the exact amount of the contribution.
- If an author contributed significantly higher than other authors, the contribution bar could overflow into multiple lines.
We allow contribution bars to overflow into multiple lines (rather than adjust the scale to fit the maximum bar length) to prevent a minority of i.e., those contributing an unusually high amount of codeoutliers from affecting the scale of the majority.
Tool bar
The Tool Bar at the top of the Chart panel provides a set of configuration options that control the Chart panel.
Search: filters the author and repository by keywords.- Multiple keywords/terms can be used, separated by spaces.
- Entries that contain any (not necessarily all) of the search terms will be displayed.
- The keywords used to filter the author and repository are case-insensitive.
Group by: grouping criteria for the rows of results.None: results will not be grouped in any particular way.Repo/Branch: results will be grouped by repositories and its' associating branches.Author: results will be grouped by the name of the author. Contributions made to multiple repositories by a particular author will be grouped under the author.
Sort groups by: sorting criteria for the main group. See note [1] below.Group title: groups will be sorted by the title of the group (in bold text) in alphabetical order.Contribution: groups will be sorted by the combined contributions within a group, in the order of number of lines added.Variance: groups will be sorted by how far the daily contributions are spread out from their average value among all authors involved. A detailed definition of variance is located here.
Sort within groups by: sorting criteria within each group.Title: each group will be internally sorted by it's title in alphabetical order.Contribution: each group will be internally sorted by individual contributions in the order of number of lines added.Variance: each group will be internally sorted by how far the daily contributions are spread out from their average value by each author into a particular repo. A detailed definition of variance is located here.
Granularity: the period of time for which commits are aggregated in the Ramp Chart.Commit: each commit made is shown as one ramp.Day: commits within a day (commits made within 00:00 to 23:59) are shown as one ramp.Week: commits within a week (from Monday 00:00 to Sunday 23:59) are shown as one ramp.
Since,Until: the date range for the Ramp Chart (not applied to the Contribution Bars).Reset date range: resets the date range of the Ramp Chart to the default date range.Breakdown by file type: toggles the contribution bar to either display the bar by :- the total lines of codes added (if the checkbox is left unchecked), or
- a breakdown of the number of lines of codes added to each file type (if the checkbox is checked). More info on note [3] below.
Merge group: merges all the ramp charts of each group into a single ramp chart; aggregates the contribution of each group.- viewing of authored code of the group as a whole is available when
group by repos.
- viewing of authored code of the group as a whole is available when
Notes:
[1] Sort groups by: each main group has its own index and percentile according to its ranking position after sorting (e.g., if the groups are sorted by contribution in descending order, a 25% percentile indicates that the group is in the top 25% of the whole cohort in terms of contribution)
.
[2] Repo/Branch: the repo/branch name is constructed as ORGANIZATION/REPOSITORY[BRANCH] (e.g., reposense/reposense[master])
[3] The total contribution of each group will get updated based on the checked file types and will be taken into account when the sorting criteria is contribution.
RepoSense support intelligent bookmarks: Note how the browser URL changes as you modify settings in the report. If you send that URL to someone else, that person will be able to use that URL to view the report in the same view configuration you had when you copied the URL. For example, this URL and this URL give two different views of the same report.
Code panel
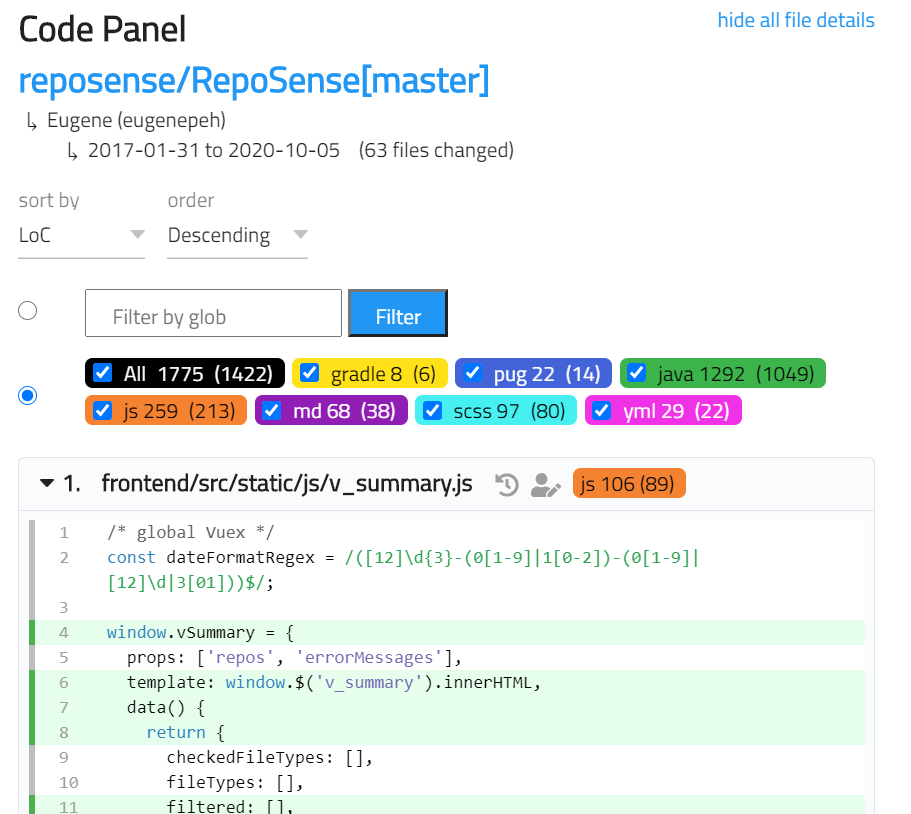
The Code panel allows users to see the code attributed to a specific author. Click on the </> icon beside the author's name in the Chart panel to display the Code panel on the right.
- The Code panel shows the files that contain the author's contributions, sorted by the number of lines written.
- Select the radio button to enable one of the following 2 filters. Note that only 1 of the 2 filters is active at any time.
- Type file path glob in glob filter to include files matching the glob expression.
- Select the checkboxes to include files of preferred file extensions. The number right beside the file extension shows the total number of lines written by the author in such file extension files. In contrast, the number inside the parenthesis indicates the number of non-blank lines written by the author.
- Clicking the file title toggles the file content.
- Clicking the first icon beside the file title opens the history view of the file on GitHub.
- Clicking the second icon beside the file title opens the blame view of the file on GitHub.
- Code attributed to the author is highlighted in green.
- Non-trivial code segments that the selected author does not write are hidden by default, but you can toggle them by clicking on the icon.
Commits panel
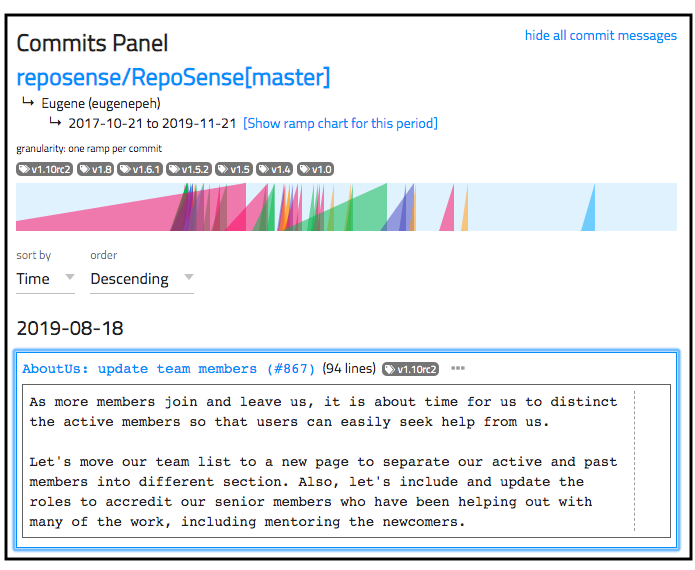
The Commits panel allows users to see the commits attributed to a specific author.
- To view all commits attributed to an author, locate the author's ramp chart in the chart panel, and click on the icon above the ramp chart.
- To view commits of a specific period, locate the author's ramp chart in the chart panel, hold down the Ctrl key (⌘ in MacOS), and click on the start and end positions of the period (on the ramp chart) you want to view.
- The commits can be sorted by the date it was committed or by LoC.
- The tags of the commits will also be displayed on top if any. Clicking on a tag will direct you to the commit having that particular tag.
- The date range for the
Chart panelcan be updated by clicking on the "Show ramp chart for this period" below the name of the author. - The ramp chart at the top of the
Commits panelrepresents individual commits (not weekly or daily contributions). - The commit messages body can be expanded or collapsed by clicking on the icon beside each commit message title.
- To promote and encourage the 50/72 rule for commit messages, a dotted vertical line will be shown for:
- Commit message subject that exceeds 50 characters.
- Commit message body after the 72nd character mark.
2 Generate your own reports
The next step is to generate your own RepoSense reports, either in your computer, or on one of the remote platforms we support.
Generating reports
Generating a report
Let's look at different ways to generate RepoSense reports.
-
If you have Java on your computer, the straight-forward way to generate a report is to use the RepoSense executable to generate the report locally on your computer, as explained in the Generating reports locally section below.
-
If you don't have Java on your computer or do not wish to run the executable on your computer, some alternatives are provided in the Generating reports remotely section below.
Generating reports locally
-
Ensure you have the prerequisites:
-
Download the latest JAR file from our releases.
-
Generate a report: The simplest use case for RepoSense is to generate a report for the recent history of a repo.
command:java -jar RepoSense.jar --repos LIST_OF_REPO_URLS --view
Examples:java -jar RepoSense.jar --repos https://github.com/reposense/RepoSense.git --view(note the.gitat the end of the repo URL)java -jar RepoSense.jar --repos https://github.com/reposense/RepoSense.git c:/myRepose/foo/bar --viewanalyzes the two specified repos (one remote, one local).
The above commands will analyze the given repo(s) for commits done within the last month and open the report in your default Browser.
To learn how to generate a report using e.g., generate a report for a different period, for specific file types, for specific authors, etc.other settings, head over to the Customizing reports section.
Generating reports remotely
You can generate a RepoSense report remotely without installing/running anything on your computer. This is particularly useful when you are deciding whether to adopt RepoSense.
The easiest option is to use Netlify. The instructions are given below.
Appendix: Using RepoSense with Netlify → Setting up
Note that Netlify has a low limit for free tier users (only 300 build minutes per month as at June 2020 -- a single report generation can take 2-3 build minutes, longer if your report includes many/big repositories).
Setting up
Step 1 Fork the publish-RepoSense repository using this link. Optionally, you can rename the fork to match your RepoSense report e.g., project-code-dashboard.
Step 2 Set up Netlify for your fork as described in this guide.
You will need to use the following in Step 5: Configure Your Settings of that guide:
- build command:
pip install requests && ./run.sh - publish directory:
./reposense-report
After Netlify finishes building the site, you should be able to see a dummy report at the URL of your Netlify site.
Step 3 Generate the report you want by updating the settings in your fork.
- Go to the
run.shfile of your fork (on GitHub). - Update the last line (i.e., the command for running RepoSense) to match the report you want to generate:
java -jar RepoSense.jar --repos FULL_REPO_URL(assuming you want to generate a default report for just one repo)
e.g.,java -jar RepoSense.jar --repos https://github.com/reposense/RepoSense.git(note the .git at the end of the repo URL) - Commit the file. This will trigger Netlify to rebuild the report.
- Go to the URL of your Netlify site to see the updated RepoSense report (it might take about 2-5 minutes for Netlify to generate the report).
You can also use the following options. While they are more work to set up, they are more suitable as a permanent solution due to their generous free tier.
Appendix: Using RepoSense with GitHub Actions → Setting up
You can use GitHub Actions (together with other GitHub tools) to automate the generating and publishing of RepoSense reports.
Setting up
The instructions below assume you are using GitHub pages to host your report.
Step 1 Fork the publish-RepoSense repository using this link. Optionally, you can rename the fork to match your RepoSense report e.g., project-code-dashboard.
Step 2 Generate a personal access token or deploy key on GitHub as explained in the panel below.
Granting write access on GitHub
Granting write-access to a repository
We recommend using a personal access token if aiming for the ease of setup and deploy key if aiming for enhanced security.
If you wish to use personal access token:
- Create a personal access token by following this guide and give only
public_repopermission. - Copy the token for later use.
If you wish to use deploy key:
[Windows users] ssh-keygen and base64 are accessible using Git Bash.
- Create a public-private key pair (without a passphrase) using the
ssh-keygen.
i.e.,ssh-keygen -t ecdsa -b 521 -f id_reposense -q -N "" - Create a deploy key as follows:
- Go to the
settingspage of your publish-RepoSense fork - Click on the
Deploy keysitem in the navigation menu in that page - Click on the
Add deploy keybutton and create a new deploy key with the contents ofid_reposense.pub.
- Go to the
- Copy the private key in base64 encoded format for later use.
i.e.,cat id_reposense | base64 -w 0
Step 3 Add the token/key as a secret:
- Go to the
Settingspage of your fork of the publish-RepoSense repo. - Click on the
Secretsmenu item on the left of that page. - Click on
Add secret. - Add a new secret with the name
ACCESS_TOKENorDEPLOY_KEY(depending on your earlier choice) and the value of the token/key you copied earlier.

Step 4 Update report configuration:
In your fork, edit run.sh (and if applicable, repo-config.csv, author-config.csv, group-config.csv) to customize the command line parameters or repositories to be analyzed.
Appendix: run.sh format
Appendix: run.sh format
run.sh is a script used for automating RepoSense report generation.
Customizing the RepoSense command
You can update the RepoSense command (i.e., the last line) in the run.sh to match your needs.
Appendix: CLI syntax reference
Appendix: CLI syntax reference
The command java -jar RepoSense.jar takes several flags.
Examples:
An example of a command using most parameters:
java -jar RepoSense.jar --repos https://github.com/reposense/RepoSense.git --output ./report_folder --since 31/1/2017 --until 31/12/2018 --formats java adoc xml --view --ignore-standalone-config --last-modified-date --timezone UTC+08
Same command as above but using most parameters in alias format:
java -jar RepoSense.jar -r https://github.com/reposense/RepoSense.git -o ./report_folder -s 31/1/2017 -u 31/12/2018 -f java adoc xml -v -i -l -t UTC+08
The section below provides explanations for each of the flags.
--assets, -a
--assets ASSETS_DIRECTORY: Specifies where to place assets for report generation.
- Parameter:
ASSETS_DIRECTORYThe directory containing the assets files. Afavicon.icofile can be placed here to customize the favicon of the dashboard. - Alias:
-a - Example:
--assets ./assetsor-a ./assets
- If
--assetsis not specified, RepoSense looks for assets in the./assetsdirectory.
--config, -c
--config CONFIG_DIRECTORY: Specifies that config files located in CONFIG_DIRECTORY should be used to customize the report.
- Parameter:
CONFIG_DIRECTORYThe directory containing the config files. Should contain arepo-config.csvfile. Optionally, can contain anauthor-config.csvfile or/and agroup-config.csvfile or/and areport-config.jsonfile. - Alias:
-c - Example:
java -jar RepoSense.jar --config ./config
- Cannot be used with
--repos. - If both
--reposand--configare not specified, RepoSense looks for config files in the./configdirectory.
--formats, -f
--formats LIST_OF_FORMATS: Specifies which file extensions to be included in the analysis.
- Parameter:
LIST_OF_FORMATSA space-separated list of file extensions that should be included in the analysis.
Default: all file formats - Alias:
-f - Example:
--formats css fxml gradleor-f css fxml gradle
--help, -h
--help: Shows the help message.
- Alias:
-h
Cannot be used with any other flags.
--ignore-standalone-config, -i
--ignore-standalone-config: Specifies that the standalone config file in the repo should be ignored.
- Default: the standalone config file is not ignored
- Alias:
-i - Example:
--ignore-standalone-configor-i
This flag overrides the Ignore standalone config field in the CSV config file.
--last-modified-date, -l
--last-modified-date: Specifies that the last modified date of each line of code should be added to authorship.json.
- Default: the last modified date of each line of code will not be added to
authorship.json - Alias:
-l(lowercase L) - Example:
--last-modified-dateor-l
The last modified dates will be in the same timezone specified with the --timezone flag.
--output, -o
--output OUTPUT_DIRECTORY: Indicates where to save the report generated.
- Parameter:
OUTPUT_DIRECTORYThe location for the generatedreposense-reportfolder.
Default: current directory - Alias:
-o - Example:
--output ./fooor-o ./foo(the report will be in the./foo/reposense-reportfolder)
--period, -p
--period PERIOD: Specifies the period of analysis window.
- Parameter:
PERIODThe period of analysis window, in the formatnd(for n days) ornw(for n weeks). It is used to calculate end date if only start date is specified, or calculate end date if only start date is specified. - Alias:
-p - Example:
--period 30dor--period 4w
- If both start date and end date are not specified, the date of generating the report will be taken as the end date.
- Cannot be used with both
--sinceand--until.
--repos, -r
--repos REPO_LOCATION: Specifies which repositories to analyze.
- Parameter:
REPO_LOCATIONA list of URLs or the disk location of the git repositories to analyze, separated by spaces. - Alias:
-r - Examples:
--repos https://github.com/reposense/RepoSense.git--repos https://github.com/reposense/RepoSense.git c:/myRepose/foo/bar: analyzes the two specified repos (one remote, one local) and generates one report containing details of both.
Cannot be used with --config.
--since, -s
--since START_DATE: Specifies the start date for the period to be analyzed.
- Parameter:
START_DATEThe first day of the period to be analyzed, in the formatDD/MM/YYYY.
Default: one month before the current date - Alias:
-s - Example:
--since 21/10/2017or-s 21/10/2017
- If the start date is not specified, only commits made one month before the end date (if specified) or the date of generating the report, will be captured and analyzed.
- If
d1is specified as the start date (--since d1or-s d1), then the earliest commit date of all repositories will be taken as the since date.
--timezone, -t
--timezone ZONE_ID: Indicates the timezone to be used for the analysis.
- Parameter:
ZONE_IDThe timezone in the formatZONE_ID[±hh[mm]].
Default: system's default timezone - Alias:
-t - Example:
--timezone UTC+08or-t UTC-1030
--until, -u
--until END_DATE: Specifies the end date of the analysis period.
- Parameter:
END_DATEThe last date of the period to be analyzed, in the formatDD/MM/YYYY.
Default: current date - Alias:
-u - Example:
--until 21/10/2017or-u 21/10/2017
Note: If the end date is not specified, the date of generating the report will be taken as the end date.
--version, -V
--version: Shows the version of RepoSense.
- Alias:
-V(upper case)
Cannot be used with any other flags.
--view, -v
--view [REPORT_FOLDER]: Specifies that the report should be opened in the default browser.
- Parameter:
REPORT_FOLDEROptional. If specified, no analysis will be performed and the report specified by the argument will be opened.
Default:./reposense-report - Alias:
-v - Example:
--viewor-v
Specifying which version of RepoSense to use
Depending on which version you wish to use for report generation, add one of the following flags to the line ./get-reposense.py in run.sh (e.g., ./get-reposense.py --release):
--release: Use the latest release (Stable)--master: Use the latest version of the master branch--tag TAGe.g.,--tag v1.6.1: use the version identified by the git tag given
Appendix: Config files format
Appendix: Config files format
Given below are the details of the various config files used by RepoSense.
RepoSense ignores the first row (i.e., column headings) of CSV config files. It is used simply to provide more information to human readers. This also means the columns in your config files should be in the exact order specified here.
A value in a config file is optional to provide unless it is specified as mandatory.
repo-config.csv
repo-config.csv file contains repo-level config data. Each row represents a repository's configuration (example).
| Column Name | Explanation |
|---|---|
| Repository's Location mandatory | The GitHub URL or Disk Path to the git repository e.g., https://github.com/foo/bar.git or C:\Users\user\Desktop\GitHub\foo\bar |
| Branch | The branch to analyze in the target repository, e.g., master. Default: the default branch of the repo |
| File formats*+ | The file extensions to analyze. Default: all file formats |
| Ignore Glob List*+ | The list of file path globs to ignore during analysis for each author, e.g., test/**;temp/** |
| Ignore standalone config | To ignore the standalone config file (if any) in the target repository, enter yes. If the cell is empty, the standalone config file in the repo (if any) will take precedence over configurations provided in the csv files. |
| Ignore Commit List*+ | The list of commits to ignore during analysis. For accurate results, the commits should be provided with their full hash. Additionally, a range of commits can be specified using the .. notation, e.g., abc123..def456 (both inclusive). |
| Ignore Authors List*+ | The list of authors to ignore during analysis. Authors should be specified by their Git Author Name. |
* Multi-value column: multiple values can be entered in this column using a semicolon ; as the separator.
+ Overrideable column: prepend with override: to use entered value(s) instead of value(s) from standalone config.
When using standalone config (if it is not ignored), it is possible to override specific values from the standalone config by prepending the entered value with override:.
author-config.csv
Optionally, you can use an author-config.csv (which should be in the same directory as the repo-config.csv file) to provide more details about the authors to analyze (example). It should contain the following columns:
| Column Name | Explanation |
|---|---|
| Repository's Location | Same as repo-config.csv. Default: all the repos in repo-config.csv |
| Branch | The branch to analyze for this author, e.g., master. Default: the author will be bound to all the repos in repo-config.csv that has the same repo's location, regardless of branch. |
| Author's GitHub ID mandatory | GitHub username of the target author, e.g., JohnDoe |
| Author's Emails* | Associated Github emails of the author. This can be found in your GitHub settings. |
| Author's Display Name | The name to display for the author. Default: author's GitHub username. |
| Author's Git Author Name* | The meaning of Git Author Name is explained in A note about git author name. |
| Ignore Glob List* | Files to ignore for this author, in addition to files ignored by the patterns specified in repo-config.csv |
* Multi-value column: multiple values can be entered in this column using a semicolon ; as the separator.
If author-config.csv is not given and the repo has not provided author details in a standalone config file, all the authors of the repositories within the date range specified (if any) will be analyzed.
group-config.csv
Optionally, you can provide a group-config.csv(which should be in the same directory as repo-config.csv file) to provide details on any custom groupings for files in specified repositories (example). It should contain the following columns:
| Column Name | Explanation |
|---|---|
| Repository's Location | Same as repo-config.csv. Default: all the repos in repo-config.csv |
| Group Name mandatory | Name of the group, e.g.,test. |
| Globs * mandatory | The list of file path globs to include for specified group, e.g.,**/test/*;**.java. |
* Multi-value column: multiple values can be entered in this column using a semicolon ; as the separator.
Note that a file in a given repository should only be tagged to one group.
e.g.: example.java in example-repo can either be in the test group or the code group, but not in both test and code group. If multiple groups are specified for a given file, the latter group (i.e., code group) is set for the file.
report-config.json
You can optionally use report-config.json to customize report generation by providing the following information. (example)
Fields to provide:
title: Title of the generated report, which is also the title of the deployed dashboard. Default: "RepoSense Report"
config.json (standalone config file)
Repo owners can provide the following additional information to RepoSense using a config file that we call the standalone config file:
- which files/authors/commits to analyze/omit
- which git and GitHub usernames belong to which authors
- the display of an author
To use this feature, add a _reposense/config.json to the root of your repo using the format in the example below (another example) and commit it (reason: RepoSense can see committed code only):
{
  "ignoreGlobList": ["about-us/**", "**index.html"],
  "formats": ["html", "css"],
  "ignoreCommitList": ["90018e49f129ce7e0abdc8b18e91c9813588c601", "67890def", "abc123..def456"],
  "ignoreAuthorList": ["charlie"],
  "authors":
  [
    {
      "githubId": "alice",
      "emails": ["alice@example.com", "alicet@example.com"],
      "displayName": "Alice T.",
      "authorNames": ["AT", "A"],
      "ignoreGlobList": ["**.css"]
    },
    {
      "githubId": "bob"
    }
  ]
}
Note: all fields are optional unless specified otherwise.
Fields to provide repository-level info:
ignoreGlobList: Folders/files to ignore, specified using the glob format.formats: File formats to analyze. Default: all file formatsignoreCommitList: The list of commits to ignore during analysis. For accurate results, the commits should be provided with their full hash. Additionally, a range of commits can be specified using the..notation e.g.abc123..def456(both inclusive).ignoreAuthorList: The list of authors to ignore during analysis. Authors specified inauthorsfield orauthor-config.csvwill be also be omitted if they are in this list. Authors should be specified by their Git Author Name.
Fields to provide author-level info:
Note: authors field should contain all authors that should be captured in the analysis.
githubId: GitHub username of the author. mandatory field.emails: Associated GitHub emails of the author. This can be found in your GitHub settings.displayName: Name to display on the report for this author.authorNames: Git Author Name(s) used in the author's commits. By default, RepoSense assumes an author would use her GitHub username as the Git username too. The meaning of Git Author Name is explained in A note about git author name.ignoreGlobList: Additional (i.e. on top of the repo-levelignoreGlobList) folders/files to ignore for a specific author . In the example above, the actualignoreGlobListforalicewould be["about-us/**", "**index.html", "**.css"]
To verify your standalone configuration is as intended, add the _reposense/config.json to your local copy of repo and run RepoSense against it as follows:
- Format:
java -jar RepoSense.jar --repo LOCAL_REPO_LOCATION - Example:
java -jar RepoSense.jar --repo c:/myRepose/foo/bar
After that, view the report to see if the configuration you specified in the config file is being reflected correctly in the report.
A note about git author name
Git Author Name refers to the customizable author's display name set in the local .gitconfig file. For example, in the Git Log's display:
...
commit cd7f610e0becbdf331d5231887d8010a689f87c7
Author: ConfiguredAuthorName <author@example.com>
Date:   Fri Feb 9 19:14:41 2018 +0800

    Make some changes to show my new author's name

commit e3f699fd4ef128eebce98d5b4e5b3bb06a512f49
Author: ActualGitHubId <author@example.com>
Date:   Fri Feb 9 19:13:13 2018 +0800

    Initial commit
 ...
ActualGitHubId and ConfiguredAuthorName are both Git Author Name of the same author.
To find the author name that you are currently using for your current git repository, run the following command within your git repository:
git config user.name
To set the author name to the value you want (e.g., to set it to your GitHub username) for your current git repository, you can use the following command (more info):
git config user.name "YOUR_AUTHOR_NAME”
To set the author name to use a default value you want for future git repositories, you can use the following command:
git config --global user.name "YOUR_AUTHOR_NAME”
RepoSense expects the Git Author Name to be the same as author's GitHub username. If an author's Git Author Name is different from her GitHub ID, the Git Author Name needs to be specified in the standalone config file. If the author has more than one Git Author Name, multiple values can be entered too.
Note: Symbols such as ", !, / etc. in your author name will be omitted, which may reduce the accuracy of the analysis if 2 names in the repository are approximately similar.
Step 5 View the generated report:
To access your regenerated RepoSense report, go to the settings of your fork in GitHub, under GitHub Pages section, look for Your site is published at [LINK]. It should look something like https://[YOUR_GITHUB_ID].github.io/publish-RepoSense.

Appendix: Using RepoSense with Travis → Setting up
You can use the CI tool Travis to automate generating and publishing of RepoSense reports.
Setting up
The instructions below assume you are using GitHub pages to host your report.
Step 1 Fork the publish-RepoSense repository using this link. Optionally, you can rename the fork to match your RepoSense report e.g., project-code-dashboard.
Step 2 Generate a personal access token or deploy key on GitHub as explained in the panel below.
Granting write access on GitHub
Granting write-access to a repository
We recommend using a personal access token if aiming for the ease of setup and deploy key if aiming for enhanced security.
If you wish to use personal access token:
- Create a personal access token by following this guide and give only
public_repopermission. - Copy the token for later use.
If you wish to use deploy key:
[Windows users] ssh-keygen and base64 are accessible using Git Bash.
- Create a public-private key pair (without a passphrase) using the
ssh-keygen.
i.e.,ssh-keygen -t ecdsa -b 521 -f id_reposense -q -N "" - Create a deploy key as follows:
- Go to the
settingspage of your publish-RepoSense fork - Click on the
Deploy keysitem in the navigation menu in that page - Click on the
Add deploy keybutton and create a new deploy key with the contents ofid_reposense.pub.
- Go to the
- Copy the private key in base64 encoded format for later use.
i.e.,cat id_reposense | base64 -w 0
Step 3 Login to Travis-CI. You may have to sign up first.
Step 4 Syncy your Travis account with GitHub:
- Go to your account.
- Click on
Sync accountto fetch all your repositories into Travis-CI.
Step 5 Activate the repository:
- Go to your publish-RepoSense fork in Travis-CI
- Under
Currenttab, click onActivate repository.
Step 6 Set the token/key:
- In the same page, click on
More optionson the right. - Then, click on the
Settingsoption:

- Under
Environment Variables, name a variable asGITHUB_TOKENorGITHUB_DEPLOY_KEYdepending on your earlier choice and paste the token/key into its value field; then clickAdd. - Ensure that the
Display value in build logisswitched offfor security reasons:

Step 7 Update the report configuration:
In your fork, edit run.sh (and if applicable, repo-config.csv, author-config.csv, group-config.csv) to customize the command line parameters or repositories to be analyzed.
Appendix: run.sh format
Appendix: run.sh format
run.sh is a script used for automating RepoSense report generation.
Customizing the RepoSense command
You can update the RepoSense command (i.e., the last line) in the run.sh to match your needs.
Appendix: CLI syntax reference
Appendix: CLI syntax reference
The command java -jar RepoSense.jar takes several flags.
Examples:
An example of a command using most parameters:
java -jar RepoSense.jar --repos https://github.com/reposense/RepoSense.git --output ./report_folder --since 31/1/2017 --until 31/12/2018 --formats java adoc xml --view --ignore-standalone-config --last-modified-date --timezone UTC+08
Same command as above but using most parameters in alias format:
java -jar RepoSense.jar -r https://github.com/reposense/RepoSense.git -o ./report_folder -s 31/1/2017 -u 31/12/2018 -f java adoc xml -v -i -l -t UTC+08
The section below provides explanations for each of the flags.
--assets, -a
--assets ASSETS_DIRECTORY: Specifies where to place assets for report generation.
- Parameter:
ASSETS_DIRECTORYThe directory containing the assets files. Afavicon.icofile can be placed here to customize the favicon of the dashboard. - Alias:
-a - Example:
--assets ./assetsor-a ./assets
- If
--assetsis not specified, RepoSense looks for assets in the./assetsdirectory.
--config, -c
--config CONFIG_DIRECTORY: Specifies that config files located in CONFIG_DIRECTORY should be used to customize the report.
- Parameter:
CONFIG_DIRECTORYThe directory containing the config files. Should contain arepo-config.csvfile. Optionally, can contain anauthor-config.csvfile or/and agroup-config.csvfile or/and areport-config.jsonfile. - Alias:
-c - Example:
java -jar RepoSense.jar --config ./config
- Cannot be used with
--repos. - If both
--reposand--configare not specified, RepoSense looks for config files in the./configdirectory.
--formats, -f
--formats LIST_OF_FORMATS: Specifies which file extensions to be included in the analysis.
- Parameter:
LIST_OF_FORMATSA space-separated list of file extensions that should be included in the analysis.
Default: all file formats - Alias:
-f - Example:
--formats css fxml gradleor-f css fxml gradle
--help, -h
--help: Shows the help message.
- Alias:
-h
Cannot be used with any other flags.
--ignore-standalone-config, -i
--ignore-standalone-config: Specifies that the standalone config file in the repo should be ignored.
- Default: the standalone config file is not ignored
- Alias:
-i - Example:
--ignore-standalone-configor-i
This flag overrides the Ignore standalone config field in the CSV config file.
--last-modified-date, -l
--last-modified-date: Specifies that the last modified date of each line of code should be added to authorship.json.
- Default: the last modified date of each line of code will not be added to
authorship.json - Alias:
-l(lowercase L) - Example:
--last-modified-dateor-l
The last modified dates will be in the same timezone specified with the --timezone flag.
--output, -o
--output OUTPUT_DIRECTORY: Indicates where to save the report generated.
- Parameter:
OUTPUT_DIRECTORYThe location for the generatedreposense-reportfolder.
Default: current directory - Alias:
-o - Example:
--output ./fooor-o ./foo(the report will be in the./foo/reposense-reportfolder)
--period, -p
--period PERIOD: Specifies the period of analysis window.
- Parameter:
PERIODThe period of analysis window, in the formatnd(for n days) ornw(for n weeks). It is used to calculate end date if only start date is specified, or calculate end date if only start date is specified. - Alias:
-p - Example:
--period 30dor--period 4w
- If both start date and end date are not specified, the date of generating the report will be taken as the end date.
- Cannot be used with both
--sinceand--until.
--repos, -r
--repos REPO_LOCATION: Specifies which repositories to analyze.
- Parameter:
REPO_LOCATIONA list of URLs or the disk location of the git repositories to analyze, separated by spaces. - Alias:
-r - Examples:
--repos https://github.com/reposense/RepoSense.git--repos https://github.com/reposense/RepoSense.git c:/myRepose/foo/bar: analyzes the two specified repos (one remote, one local) and generates one report containing details of both.
Cannot be used with --config.
--since, -s
--since START_DATE: Specifies the start date for the period to be analyzed.
- Parameter:
START_DATEThe first day of the period to be analyzed, in the formatDD/MM/YYYY.
Default: one month before the current date - Alias:
-s - Example:
--since 21/10/2017or-s 21/10/2017
- If the start date is not specified, only commits made one month before the end date (if specified) or the date of generating the report, will be captured and analyzed.
- If
d1is specified as the start date (--since d1or-s d1), then the earliest commit date of all repositories will be taken as the since date.
--timezone, -t
--timezone ZONE_ID: Indicates the timezone to be used for the analysis.
- Parameter:
ZONE_IDThe timezone in the formatZONE_ID[±hh[mm]].
Default: system's default timezone - Alias:
-t - Example:
--timezone UTC+08or-t UTC-1030
--until, -u
--until END_DATE: Specifies the end date of the analysis period.
- Parameter:
END_DATEThe last date of the period to be analyzed, in the formatDD/MM/YYYY.
Default: current date - Alias:
-u - Example:
--until 21/10/2017or-u 21/10/2017
Note: If the end date is not specified, the date of generating the report will be taken as the end date.
--version, -V
--version: Shows the version of RepoSense.
- Alias:
-V(upper case)
Cannot be used with any other flags.
--view, -v
--view [REPORT_FOLDER]: Specifies that the report should be opened in the default browser.
- Parameter:
REPORT_FOLDEROptional. If specified, no analysis will be performed and the report specified by the argument will be opened.
Default:./reposense-report - Alias:
-v - Example:
--viewor-v
Specifying which version of RepoSense to use
Depending on which version you wish to use for report generation, add one of the following flags to the line ./get-reposense.py in run.sh (e.g., ./get-reposense.py --release):
--release: Use the latest release (Stable)--master: Use the latest version of the master branch--tag TAGe.g.,--tag v1.6.1: use the version identified by the git tag given
Appendix: Config files format
Appendix: Config files format
Given below are the details of the various config files used by RepoSense.
RepoSense ignores the first row (i.e., column headings) of CSV config files. It is used simply to provide more information to human readers. This also means the columns in your config files should be in the exact order specified here.
A value in a config file is optional to provide unless it is specified as mandatory.
repo-config.csv
repo-config.csv file contains repo-level config data. Each row represents a repository's configuration (example).
| Column Name | Explanation |
|---|---|
| Repository's Location mandatory | The GitHub URL or Disk Path to the git repository e.g., https://github.com/foo/bar.git or C:\Users\user\Desktop\GitHub\foo\bar |
| Branch | The branch to analyze in the target repository, e.g., master. Default: the default branch of the repo |
| File formats*+ | The file extensions to analyze. Default: all file formats |
| Ignore Glob List*+ | The list of file path globs to ignore during analysis for each author, e.g., test/**;temp/** |
| Ignore standalone config | To ignore the standalone config file (if any) in the target repository, enter yes. If the cell is empty, the standalone config file in the repo (if any) will take precedence over configurations provided in the csv files. |
| Ignore Commit List*+ | The list of commits to ignore during analysis. For accurate results, the commits should be provided with their full hash. Additionally, a range of commits can be specified using the .. notation, e.g., abc123..def456 (both inclusive). |
| Ignore Authors List*+ | The list of authors to ignore during analysis. Authors should be specified by their Git Author Name. |
* Multi-value column: multiple values can be entered in this column using a semicolon ; as the separator.
+ Overrideable column: prepend with override: to use entered value(s) instead of value(s) from standalone config.
When using standalone config (if it is not ignored), it is possible to override specific values from the standalone config by prepending the entered value with override:.
author-config.csv
Optionally, you can use an author-config.csv (which should be in the same directory as the repo-config.csv file) to provide more details about the authors to analyze (example). It should contain the following columns:
| Column Name | Explanation |
|---|---|
| Repository's Location | Same as repo-config.csv. Default: all the repos in repo-config.csv |
| Branch | The branch to analyze for this author, e.g., master. Default: the author will be bound to all the repos in repo-config.csv that has the same repo's location, regardless of branch. |
| Author's GitHub ID mandatory | GitHub username of the target author, e.g., JohnDoe |
| Author's Emails* | Associated Github emails of the author. This can be found in your GitHub settings. |
| Author's Display Name | The name to display for the author. Default: author's GitHub username. |
| Author's Git Author Name* | The meaning of Git Author Name is explained in A note about git author name. |
| Ignore Glob List* | Files to ignore for this author, in addition to files ignored by the patterns specified in repo-config.csv |
* Multi-value column: multiple values can be entered in this column using a semicolon ; as the separator.
If author-config.csv is not given and the repo has not provided author details in a standalone config file, all the authors of the repositories within the date range specified (if any) will be analyzed.
group-config.csv
Optionally, you can provide a group-config.csv(which should be in the same directory as repo-config.csv file) to provide details on any custom groupings for files in specified repositories (example). It should contain the following columns:
| Column Name | Explanation |
|---|---|
| Repository's Location | Same as repo-config.csv. Default: all the repos in repo-config.csv |
| Group Name mandatory | Name of the group, e.g.,test. |
| Globs * mandatory | The list of file path globs to include for specified group, e.g.,**/test/*;**.java. |
* Multi-value column: multiple values can be entered in this column using a semicolon ; as the separator.
Note that a file in a given repository should only be tagged to one group.
e.g.: example.java in example-repo can either be in the test group or the code group, but not in both test and code group. If multiple groups are specified for a given file, the latter group (i.e., code group) is set for the file.
report-config.json
You can optionally use report-config.json to customize report generation by providing the following information. (example)
Fields to provide:
title: Title of the generated report, which is also the title of the deployed dashboard. Default: "RepoSense Report"
config.json (standalone config file)
Repo owners can provide the following additional information to RepoSense using a config file that we call the standalone config file:
- which files/authors/commits to analyze/omit
- which git and GitHub usernames belong to which authors
- the display of an author
To use this feature, add a _reposense/config.json to the root of your repo using the format in the example below (another example) and commit it (reason: RepoSense can see committed code only):
{
  "ignoreGlobList": ["about-us/**", "**index.html"],
  "formats": ["html", "css"],
  "ignoreCommitList": ["90018e49f129ce7e0abdc8b18e91c9813588c601", "67890def", "abc123..def456"],
  "ignoreAuthorList": ["charlie"],
  "authors":
  [
    {
      "githubId": "alice",
      "emails": ["alice@example.com", "alicet@example.com"],
      "displayName": "Alice T.",
      "authorNames": ["AT", "A"],
      "ignoreGlobList": ["**.css"]
    },
    {
      "githubId": "bob"
    }
  ]
}
Note: all fields are optional unless specified otherwise.
Fields to provide repository-level info:
ignoreGlobList: Folders/files to ignore, specified using the glob format.formats: File formats to analyze. Default: all file formatsignoreCommitList: The list of commits to ignore during analysis. For accurate results, the commits should be provided with their full hash. Additionally, a range of commits can be specified using the..notation e.g.abc123..def456(both inclusive).ignoreAuthorList: The list of authors to ignore during analysis. Authors specified inauthorsfield orauthor-config.csvwill be also be omitted if they are in this list. Authors should be specified by their Git Author Name.
Fields to provide author-level info:
Note: authors field should contain all authors that should be captured in the analysis.
githubId: GitHub username of the author. mandatory field.emails: Associated GitHub emails of the author. This can be found in your GitHub settings.displayName: Name to display on the report for this author.authorNames: Git Author Name(s) used in the author's commits. By default, RepoSense assumes an author would use her GitHub username as the Git username too. The meaning of Git Author Name is explained in A note about git author name.ignoreGlobList: Additional (i.e. on top of the repo-levelignoreGlobList) folders/files to ignore for a specific author . In the example above, the actualignoreGlobListforalicewould be["about-us/**", "**index.html", "**.css"]
To verify your standalone configuration is as intended, add the _reposense/config.json to your local copy of repo and run RepoSense against it as follows:
- Format:
java -jar RepoSense.jar --repo LOCAL_REPO_LOCATION - Example:
java -jar RepoSense.jar --repo c:/myRepose/foo/bar
After that, view the report to see if the configuration you specified in the config file is being reflected correctly in the report.
A note about git author name
Git Author Name refers to the customizable author's display name set in the local .gitconfig file. For example, in the Git Log's display:
...
commit cd7f610e0becbdf331d5231887d8010a689f87c7
Author: ConfiguredAuthorName <author@example.com>
Date:   Fri Feb 9 19:14:41 2018 +0800

    Make some changes to show my new author's name

commit e3f699fd4ef128eebce98d5b4e5b3bb06a512f49
Author: ActualGitHubId <author@example.com>
Date:   Fri Feb 9 19:13:13 2018 +0800

    Initial commit
 ...
ActualGitHubId and ConfiguredAuthorName are both Git Author Name of the same author.
To find the author name that you are currently using for your current git repository, run the following command within your git repository:
git config user.name
To set the author name to the value you want (e.g., to set it to your GitHub username) for your current git repository, you can use the following command (more info):
git config user.name "YOUR_AUTHOR_NAME”
To set the author name to use a default value you want for future git repositories, you can use the following command:
git config --global user.name "YOUR_AUTHOR_NAME”
RepoSense expects the Git Author Name to be the same as author's GitHub username. If an author's Git Author Name is different from her GitHub ID, the Git Author Name needs to be specified in the standalone config file. If the author has more than one Git Author Name, multiple values can be entered too.
Note: Symbols such as ", !, / etc. in your author name will be omitted, which may reduce the accuracy of the analysis if 2 names in the repository are approximately similar.
Step 8 View the generated report:
- Go to the
Settingspage of your fork in GitHub. - Under the
GitHub Pagessection, look forYour site is published at [LINK]. It should look something likehttps://[YOUR_GITHUB_ID].github.io/publish-RepoSense.
It takes a few minutes for report generation. Meanwhile, you can monitor the progress live at Travis-CI's Builds.
As you generate reports, you may need to learn how to customize those reports further.
Customizing reports
Customizing reports
The report can be customized using several ways, as explained below.
Customize using CLI flags
The simplest approach is to provide additional flags when running RepoSense. The various flags are given in the panel below.
Appendix: CLI syntax reference
Appendix: CLI syntax reference
The command java -jar RepoSense.jar takes several flags.
Examples:
An example of a command using most parameters:
java -jar RepoSense.jar --repos https://github.com/reposense/RepoSense.git --output ./report_folder --since 31/1/2017 --until 31/12/2018 --formats java adoc xml --view --ignore-standalone-config --last-modified-date --timezone UTC+08
Same command as above but using most parameters in alias format:
java -jar RepoSense.jar -r https://github.com/reposense/RepoSense.git -o ./report_folder -s 31/1/2017 -u 31/12/2018 -f java adoc xml -v -i -l -t UTC+08
The section below provides explanations for each of the flags.
--assets, -a
--assets ASSETS_DIRECTORY: Specifies where to place assets for report generation.
- Parameter:
ASSETS_DIRECTORYThe directory containing the assets files. Afavicon.icofile can be placed here to customize the favicon of the dashboard. - Alias:
-a - Example:
--assets ./assetsor-a ./assets
- If
--assetsis not specified, RepoSense looks for assets in the./assetsdirectory.
--config, -c
--config CONFIG_DIRECTORY: Specifies that config files located in CONFIG_DIRECTORY should be used to customize the report.
- Parameter:
CONFIG_DIRECTORYThe directory containing the config files. Should contain arepo-config.csvfile. Optionally, can contain anauthor-config.csvfile or/and agroup-config.csvfile or/and areport-config.jsonfile. - Alias:
-c - Example:
java -jar RepoSense.jar --config ./config
- Cannot be used with
--repos. - If both
--reposand--configare not specified, RepoSense looks for config files in the./configdirectory.
--formats, -f
--formats LIST_OF_FORMATS: Specifies which file extensions to be included in the analysis.
- Parameter:
LIST_OF_FORMATSA space-separated list of file extensions that should be included in the analysis.
Default: all file formats - Alias:
-f - Example:
--formats css fxml gradleor-f css fxml gradle
--help, -h
--help: Shows the help message.
- Alias:
-h
Cannot be used with any other flags.
--ignore-standalone-config, -i
--ignore-standalone-config: Specifies that the standalone config file in the repo should be ignored.
- Default: the standalone config file is not ignored
- Alias:
-i - Example:
--ignore-standalone-configor-i
This flag overrides the Ignore standalone config field in the CSV config file.
--last-modified-date, -l
--last-modified-date: Specifies that the last modified date of each line of code should be added to authorship.json.
- Default: the last modified date of each line of code will not be added to
authorship.json - Alias:
-l(lowercase L) - Example:
--last-modified-dateor-l
The last modified dates will be in the same timezone specified with the --timezone flag.
--output, -o
--output OUTPUT_DIRECTORY: Indicates where to save the report generated.
- Parameter:
OUTPUT_DIRECTORYThe location for the generatedreposense-reportfolder.
Default: current directory - Alias:
-o - Example:
--output ./fooor-o ./foo(the report will be in the./foo/reposense-reportfolder)
--period, -p
--period PERIOD: Specifies the period of analysis window.
- Parameter:
PERIODThe period of analysis window, in the formatnd(for n days) ornw(for n weeks). It is used to calculate end date if only start date is specified, or calculate end date if only start date is specified. - Alias:
-p - Example:
--period 30dor--period 4w
- If both start date and end date are not specified, the date of generating the report will be taken as the end date.
- Cannot be used with both
--sinceand--until.
--repos, -r
--repos REPO_LOCATION: Specifies which repositories to analyze.
- Parameter:
REPO_LOCATIONA list of URLs or the disk location of the git repositories to analyze, separated by spaces. - Alias:
-r - Examples:
--repos https://github.com/reposense/RepoSense.git--repos https://github.com/reposense/RepoSense.git c:/myRepose/foo/bar: analyzes the two specified repos (one remote, one local) and generates one report containing details of both.
Cannot be used with --config.
--since, -s
--since START_DATE: Specifies the start date for the period to be analyzed.
- Parameter:
START_DATEThe first day of the period to be analyzed, in the formatDD/MM/YYYY.
Default: one month before the current date - Alias:
-s - Example:
--since 21/10/2017or-s 21/10/2017
- If the start date is not specified, only commits made one month before the end date (if specified) or the date of generating the report, will be captured and analyzed.
- If
d1is specified as the start date (--since d1or-s d1), then the earliest commit date of all repositories will be taken as the since date.
--timezone, -t
--timezone ZONE_ID: Indicates the timezone to be used for the analysis.
- Parameter:
ZONE_IDThe timezone in the formatZONE_ID[±hh[mm]].
Default: system's default timezone - Alias:
-t - Example:
--timezone UTC+08or-t UTC-1030
--until, -u
--until END_DATE: Specifies the end date of the analysis period.
- Parameter:
END_DATEThe last date of the period to be analyzed, in the formatDD/MM/YYYY.
Default: current date - Alias:
-u - Example:
--until 21/10/2017or-u 21/10/2017
Note: If the end date is not specified, the date of generating the report will be taken as the end date.
--version, -V
--version: Shows the version of RepoSense.
- Alias:
-V(upper case)
Cannot be used with any other flags.
--view, -v
--view [REPORT_FOLDER]: Specifies that the report should be opened in the default browser.
- Parameter:
REPORT_FOLDEROptional. If specified, no analysis will be performed and the report specified by the argument will be opened.
Default:./reposense-report - Alias:
-v - Example:
--viewor-v
Customize using CSV config files
Another, more powerful, way to customize the report is by using dedicated config files. In this case you need to use the --config flag instead of the --repo flag when running RepoSense, as follows:
Appendix: CLI syntax reference → config flag
--assets ASSETS_DIRECTORY: Specifies where to place assets for report generation.
- Parameter:
ASSETS_DIRECTORYThe directory containing the assets files. Afavicon.icofile can be placed here to customize the favicon of the dashboard. - Alias:
-a - Example:
--assets ./assetsor-a ./assets
- If
--assetsis not specified, RepoSense looks for assets in the./assetsdirectory.
Managing config files collaboratively: If you use RepoSense to monitor a large number of programmers, it may be more practical to get the programmers to submit PRs to update the config files as necessary (a coder realizes some of her code is missing from the report because she used multiple git usernames, and wants to add the additional usernames to the config fileexample use case).
To ensure that their PRs are correct, you can use Netlify deploy previews to preview how the report would look like after the PR has been merged. More details are in the panels below.
Appendix: Using RepoSense with Netlify → Setting up
Note that Netlify has a low limit for free tier users (only 300 build minutes per month as at June 2020 -- a single report generation can take 2-3 build minutes, longer if your report includes many/big repositories).
Setting up
Step 1 Fork the publish-RepoSense repository using this link. Optionally, you can rename the fork to match your RepoSense report e.g., project-code-dashboard.
Step 2 Set up Netlify for your fork as described in this guide.
You will need to use the following in Step 5: Configure Your Settings of that guide:
- build command:
pip install requests && ./run.sh - publish directory:
./reposense-report
After Netlify finishes building the site, you should be able to see a dummy report at the URL of your Netlify site.
Step 3 Generate the report you want by updating the settings in your fork.
- Go to the
run.shfile of your fork (on GitHub). - Update the last line (i.e., the command for running RepoSense) to match the report you want to generate:
java -jar RepoSense.jar --repos FULL_REPO_URL(assuming you want to generate a default report for just one repo)
e.g.,java -jar RepoSense.jar --repos https://github.com/reposense/RepoSense.git(note the .git at the end of the repo URL) - Commit the file. This will trigger Netlify to rebuild the report.
- Go to the URL of your Netlify site to see the updated RepoSense report (it might take about 2-5 minutes for Netlify to generate the report).
Appendix: Using RepoSense with Netlify → PR previews
PR previews
After setting up Netlify for your repo containing RepoSense settings, when a PR comes in to that repo to update any setting, you can scroll down the PR page and in All checks have passed, click on the Details beside deploy/netlify — Deploy preview ready! to see a preview of the report as per the changes in the PR.

Get target repos to provide more info
If feasible, you can also customize the target repos to play well with RepoSense in the following two ways:
1. Add a stand-alone config file to the repo to provide more config details to RepoSense. The format of the file is given below.
Appendix: Standalone config file format
config.json (standalone config file)
Repo owners can provide the following additional information to RepoSense using a config file that we call the standalone config file:
- which files/authors/commits to analyze/omit
- which git and GitHub usernames belong to which authors
- the display of an author
To use this feature, add a _reposense/config.json to the root of your repo using the format in the example below (another example) and commit it (reason: RepoSense can see committed code only):
{
  "ignoreGlobList": ["about-us/**", "**index.html"],
  "formats": ["html", "css"],
  "ignoreCommitList": ["90018e49f129ce7e0abdc8b18e91c9813588c601", "67890def", "abc123..def456"],
  "ignoreAuthorList": ["charlie"],
  "authors":
  [
    {
      "githubId": "alice",
      "emails": ["alice@example.com", "alicet@example.com"],
      "displayName": "Alice T.",
      "authorNames": ["AT", "A"],
      "ignoreGlobList": ["**.css"]
    },
    {
      "githubId": "bob"
    }
  ]
}
Note: all fields are optional unless specified otherwise.
Fields to provide repository-level info:
ignoreGlobList: Folders/files to ignore, specified using the glob format.formats: File formats to analyze. Default: all file formatsignoreCommitList: The list of commits to ignore during analysis. For accurate results, the commits should be provided with their full hash. Additionally, a range of commits can be specified using the..notation e.g.abc123..def456(both inclusive).ignoreAuthorList: The list of authors to ignore during analysis. Authors specified inauthorsfield orauthor-config.csvwill be also be omitted if they are in this list. Authors should be specified by their Git Author Name.
Fields to provide author-level info:
Note: authors field should contain all authors that should be captured in the analysis.
githubId: GitHub username of the author. mandatory field.emails: Associated GitHub emails of the author. This can be found in your GitHub settings.displayName: Name to display on the report for this author.authorNames: Git Author Name(s) used in the author's commits. By default, RepoSense assumes an author would use her GitHub username as the Git username too. The meaning of Git Author Name is explained in A note about git author name.ignoreGlobList: Additional (i.e. on top of the repo-levelignoreGlobList) folders/files to ignore for a specific author . In the example above, the actualignoreGlobListforalicewould be["about-us/**", "**index.html", "**.css"]
To verify your standalone configuration is as intended, add the _reposense/config.json to your local copy of repo and run RepoSense against it as follows:
- Format:
java -jar RepoSense.jar --repo LOCAL_REPO_LOCATION - Example:
java -jar RepoSense.jar --repo c:/myRepose/foo/bar
After that, view the report to see if the configuration you specified in the config file is being reflected correctly in the report.
A note about git author name
Git Author Name refers to the customizable author's display name set in the local .gitconfig file. For example, in the Git Log's display:
...
commit cd7f610e0becbdf331d5231887d8010a689f87c7
Author: ConfiguredAuthorName <author@example.com>
Date:   Fri Feb 9 19:14:41 2018 +0800

    Make some changes to show my new author's name

commit e3f699fd4ef128eebce98d5b4e5b3bb06a512f49
Author: ActualGitHubId <author@example.com>
Date:   Fri Feb 9 19:13:13 2018 +0800

    Initial commit
 ...
ActualGitHubId and ConfiguredAuthorName are both Git Author Name of the same author.
To find the author name that you are currently using for your current git repository, run the following command within your git repository:
git config user.name
To set the author name to the value you want (e.g., to set it to your GitHub username) for your current git repository, you can use the following command (more info):
git config user.name "YOUR_AUTHOR_NAME”
To set the author name to use a default value you want for future git repositories, you can use the following command:
git config --global user.name "YOUR_AUTHOR_NAME”
RepoSense expects the Git Author Name to be the same as author's GitHub username. If an author's Git Author Name is different from her GitHub ID, the Git Author Name needs to be specified in the standalone config file. If the author has more than one Git Author Name, multiple values can be entered too.
Note: Symbols such as ", !, / etc. in your author name will be omitted, which may reduce the accuracy of the analysis if 2 names in the repository are approximately similar.
2. To have more precise control over which code segment is attributed to which author, authors can annotate their code using @@author tags, as explained below.
Appendix: Using @@author tags
Appendix: Using @@author tags
@@author tags is a rather invasive but sometimes necessary way to provide more information to RepoSense, by annotating the code being analyzed.
If you want to override the code authorship deduced by RepoSense (which is based on Git blame/log data), you can use @@author tags to specify certain code segments that should be credited to a certain author irrespective of git history. An example scenario where this is useful is when a method was originally written by one author but a second author did some minor refactoring to it; in this case, RepoSense might attribute the code to the second author while you may want to attribute the code to the first author.
There are 2 types of @@author tags:
- Start Tags (format:
@@author AUTHOR_GITHUB_ID): A start tag indicates the start of a code segment written by the author identified by theAUTHOR_GITHUB_ID. - End Tags (format:
@@author): Optional. An end tag indicates the end of a code segment written by the author identified by theAUTHOR_GITHUB_IDof the start tag.
If an end tag is not provided, the code till the next start tag (or the end of the file) will be attributed to the author specified in the start tag above. Use only when necessary to minimize polluting your code with these extra tags.
The @@author tags should be enclosed within a comment, using the comment syntax of the file in concern. Below are some examples:
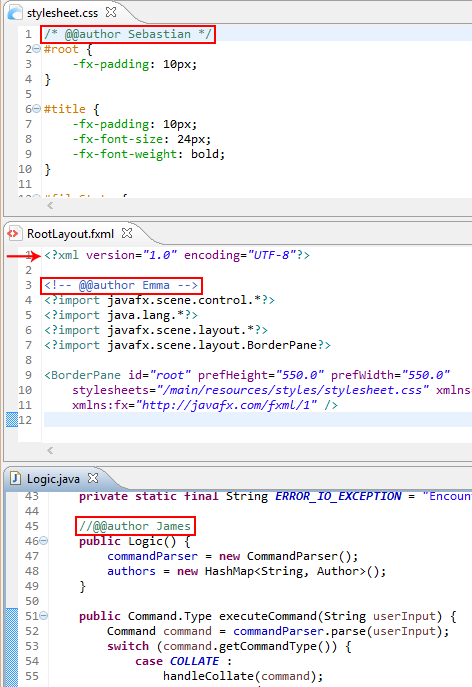
Note: Remember to commit the files after the changes. (reason: RepoSense can see committed code only)
Special thanks to Collate project for providing the inspiration for this functionality.
3 Share your reports
Finally, you can learn how to share those reports with others, and how to automate the whole process.
Sharing reports
Sharing reports
Often, you would want to share the RepoSense report with others. For example, a teacher using RepoSense for a programming class might want to share the report privately with tutors or publish it so that everyone can see it.
The sections below explain various ways of sharing a RepoSense report.
Share privately
To share a RepoSense report privately, simply find a way to share the folder containing the report (by default, it will be in a folder named reposense-report). For example, you can zip that folder and share it with the intended recipients.
You can point the recipients to the Using reports section for guidance on how to view reports.
Publish on the web
As RepoSense reports are in a web page format, you can publish a report by simply uploading it onto any web hosting service. Given below are several options that not only allow to publish reports, but also enable various levels of automating the entire process (e.g., automatically update the report daily).
Appendix: Using RepoSense with GitHub Actions
Appendix: RepoSense with GitHub Actions
You can use GitHub Actions (together with other GitHub tools) to automate the generating and publishing of RepoSense reports.
Setting up
The instructions below assume you are using GitHub pages to host your report.
Step 1 Fork the publish-RepoSense repository using this link. Optionally, you can rename the fork to match your RepoSense report e.g., project-code-dashboard.
Step 2 Generate a personal access token or deploy key on GitHub as explained in the panel below.
Granting write access on GitHub
Granting write-access to a repository
We recommend using a personal access token if aiming for the ease of setup and deploy key if aiming for enhanced security.
If you wish to use personal access token:
- Create a personal access token by following this guide and give only
public_repopermission. - Copy the token for later use.
If you wish to use deploy key:
[Windows users] ssh-keygen and base64 are accessible using Git Bash.
- Create a public-private key pair (without a passphrase) using the
ssh-keygen.
i.e.,ssh-keygen -t ecdsa -b 521 -f id_reposense -q -N "" - Create a deploy key as follows:
- Go to the
settingspage of your publish-RepoSense fork - Click on the
Deploy keysitem in the navigation menu in that page - Click on the
Add deploy keybutton and create a new deploy key with the contents ofid_reposense.pub.
- Go to the
- Copy the private key in base64 encoded format for later use.
i.e.,cat id_reposense | base64 -w 0
Step 3 Add the token/key as a secret:
- Go to the
Settingspage of your fork of the publish-RepoSense repo. - Click on the
Secretsmenu item on the left of that page. - Click on
Add secret. - Add a new secret with the name
ACCESS_TOKENorDEPLOY_KEY(depending on your earlier choice) and the value of the token/key you copied earlier.
Step 4 Update report configuration:
In your fork, edit run.sh (and if applicable, repo-config.csv, author-config.csv, group-config.csv) to customize the command line parameters or repositories to be analyzed.
Appendix: run.sh format
Appendix: run.sh format
run.sh is a script used for automating RepoSense report generation.
Customizing the RepoSense command
You can update the RepoSense command (i.e., the last line) in the run.sh to match your needs.
Appendix: CLI syntax reference
Appendix: CLI syntax reference
The command java -jar RepoSense.jar takes several flags.
Examples:
An example of a command using most parameters:
java -jar RepoSense.jar --repos https://github.com/reposense/RepoSense.git --output ./report_folder --since 31/1/2017 --until 31/12/2018 --formats java adoc xml --view --ignore-standalone-config --last-modified-date --timezone UTC+08
Same command as above but using most parameters in alias format:
java -jar RepoSense.jar -r https://github.com/reposense/RepoSense.git -o ./report_folder -s 31/1/2017 -u 31/12/2018 -f java adoc xml -v -i -l -t UTC+08
The section below provides explanations for each of the flags.
--assets, -a
--assets ASSETS_DIRECTORY: Specifies where to place assets for report generation.
- Parameter:
ASSETS_DIRECTORYThe directory containing the assets files. Afavicon.icofile can be placed here to customize the favicon of the dashboard. - Alias:
-a - Example:
--assets ./assetsor-a ./assets
- If
--assetsis not specified, RepoSense looks for assets in the./assetsdirectory.
--config, -c
--config CONFIG_DIRECTORY: Specifies that config files located in CONFIG_DIRECTORY should be used to customize the report.
- Parameter:
CONFIG_DIRECTORYThe directory containing the config files. Should contain arepo-config.csvfile. Optionally, can contain anauthor-config.csvfile or/and agroup-config.csvfile or/and areport-config.jsonfile. - Alias:
-c - Example:
java -jar RepoSense.jar --config ./config
- Cannot be used with
--repos. - If both
--reposand--configare not specified, RepoSense looks for config files in the./configdirectory.
--formats, -f
--formats LIST_OF_FORMATS: Specifies which file extensions to be included in the analysis.
- Parameter:
LIST_OF_FORMATSA space-separated list of file extensions that should be included in the analysis.
Default: all file formats - Alias:
-f - Example:
--formats css fxml gradleor-f css fxml gradle
--help, -h
--help: Shows the help message.
- Alias:
-h
Cannot be used with any other flags.
--ignore-standalone-config, -i
--ignore-standalone-config: Specifies that the standalone config file in the repo should be ignored.
- Default: the standalone config file is not ignored
- Alias:
-i - Example:
--ignore-standalone-configor-i
This flag overrides the Ignore standalone config field in the CSV config file.
--last-modified-date, -l
--last-modified-date: Specifies that the last modified date of each line of code should be added to authorship.json.
- Default: the last modified date of each line of code will not be added to
authorship.json - Alias:
-l(lowercase L) - Example:
--last-modified-dateor-l
The last modified dates will be in the same timezone specified with the --timezone flag.
--output, -o
--output OUTPUT_DIRECTORY: Indicates where to save the report generated.
- Parameter:
OUTPUT_DIRECTORYThe location for the generatedreposense-reportfolder.
Default: current directory - Alias:
-o - Example:
--output ./fooor-o ./foo(the report will be in the./foo/reposense-reportfolder)
--period, -p
--period PERIOD: Specifies the period of analysis window.
- Parameter:
PERIODThe period of analysis window, in the formatnd(for n days) ornw(for n weeks). It is used to calculate end date if only start date is specified, or calculate end date if only start date is specified. - Alias:
-p - Example:
--period 30dor--period 4w
- If both start date and end date are not specified, the date of generating the report will be taken as the end date.
- Cannot be used with both
--sinceand--until.
--repos, -r
--repos REPO_LOCATION: Specifies which repositories to analyze.
- Parameter:
REPO_LOCATIONA list of URLs or the disk location of the git repositories to analyze, separated by spaces. - Alias:
-r - Examples:
--repos https://github.com/reposense/RepoSense.git--repos https://github.com/reposense/RepoSense.git c:/myRepose/foo/bar: analyzes the two specified repos (one remote, one local) and generates one report containing details of both.
Cannot be used with --config.
--since, -s
--since START_DATE: Specifies the start date for the period to be analyzed.
- Parameter:
START_DATEThe first day of the period to be analyzed, in the formatDD/MM/YYYY.
Default: one month before the current date - Alias:
-s - Example:
--since 21/10/2017or-s 21/10/2017
- If the start date is not specified, only commits made one month before the end date (if specified) or the date of generating the report, will be captured and analyzed.
- If
d1is specified as the start date (--since d1or-s d1), then the earliest commit date of all repositories will be taken as the since date.
--timezone, -t
--timezone ZONE_ID: Indicates the timezone to be used for the analysis.
- Parameter:
ZONE_IDThe timezone in the formatZONE_ID[±hh[mm]].
Default: system's default timezone - Alias:
-t - Example:
--timezone UTC+08or-t UTC-1030
--until, -u
--until END_DATE: Specifies the end date of the analysis period.
- Parameter:
END_DATEThe last date of the period to be analyzed, in the formatDD/MM/YYYY.
Default: current date - Alias:
-u - Example:
--until 21/10/2017or-u 21/10/2017
Note: If the end date is not specified, the date of generating the report will be taken as the end date.
--version, -V
--version: Shows the version of RepoSense.
- Alias:
-V(upper case)
Cannot be used with any other flags.
--view, -v
--view [REPORT_FOLDER]: Specifies that the report should be opened in the default browser.
- Parameter:
REPORT_FOLDEROptional. If specified, no analysis will be performed and the report specified by the argument will be opened.
Default:./reposense-report - Alias:
-v - Example:
--viewor-v
Specifying which version of RepoSense to use
Depending on which version you wish to use for report generation, add one of the following flags to the line ./get-reposense.py in run.sh (e.g., ./get-reposense.py --release):
--release: Use the latest release (Stable)--master: Use the latest version of the master branch--tag TAGe.g.,--tag v1.6.1: use the version identified by the git tag given
Appendix: Config files format
Appendix: Config files format
Given below are the details of the various config files used by RepoSense.
RepoSense ignores the first row (i.e., column headings) of CSV config files. It is used simply to provide more information to human readers. This also means the columns in your config files should be in the exact order specified here.
A value in a config file is optional to provide unless it is specified as mandatory.
repo-config.csv
repo-config.csv file contains repo-level config data. Each row represents a repository's configuration (example).
| Column Name | Explanation |
|---|---|
| Repository's Location mandatory | The GitHub URL or Disk Path to the git repository e.g., https://github.com/foo/bar.git or C:\Users\user\Desktop\GitHub\foo\bar |
| Branch | The branch to analyze in the target repository, e.g., master. Default: the default branch of the repo |
| File formats*+ | The file extensions to analyze. Default: all file formats |
| Ignore Glob List*+ | The list of file path globs to ignore during analysis for each author, e.g., test/**;temp/** |
| Ignore standalone config | To ignore the standalone config file (if any) in the target repository, enter yes. If the cell is empty, the standalone config file in the repo (if any) will take precedence over configurations provided in the csv files. |
| Ignore Commit List*+ | The list of commits to ignore during analysis. For accurate results, the commits should be provided with their full hash. Additionally, a range of commits can be specified using the .. notation, e.g., abc123..def456 (both inclusive). |
| Ignore Authors List*+ | The list of authors to ignore during analysis. Authors should be specified by their Git Author Name. |
* Multi-value column: multiple values can be entered in this column using a semicolon ; as the separator.
+ Overrideable column: prepend with override: to use entered value(s) instead of value(s) from standalone config.
When using standalone config (if it is not ignored), it is possible to override specific values from the standalone config by prepending the entered value with override:.
author-config.csv
Optionally, you can use an author-config.csv (which should be in the same directory as the repo-config.csv file) to provide more details about the authors to analyze (example). It should contain the following columns:
| Column Name | Explanation |
|---|---|
| Repository's Location | Same as repo-config.csv. Default: all the repos in repo-config.csv |
| Branch | The branch to analyze for this author, e.g., master. Default: the author will be bound to all the repos in repo-config.csv that has the same repo's location, regardless of branch. |
| Author's GitHub ID mandatory | GitHub username of the target author, e.g., JohnDoe |
| Author's Emails* | Associated Github emails of the author. This can be found in your GitHub settings. |
| Author's Display Name | The name to display for the author. Default: author's GitHub username. |
| Author's Git Author Name* | The meaning of Git Author Name is explained in A note about git author name. |
| Ignore Glob List* | Files to ignore for this author, in addition to files ignored by the patterns specified in repo-config.csv |
* Multi-value column: multiple values can be entered in this column using a semicolon ; as the separator.
If author-config.csv is not given and the repo has not provided author details in a standalone config file, all the authors of the repositories within the date range specified (if any) will be analyzed.
group-config.csv
Optionally, you can provide a group-config.csv(which should be in the same directory as repo-config.csv file) to provide details on any custom groupings for files in specified repositories (example). It should contain the following columns:
| Column Name | Explanation |
|---|---|
| Repository's Location | Same as repo-config.csv. Default: all the repos in repo-config.csv |
| Group Name mandatory | Name of the group, e.g.,test. |
| Globs * mandatory | The list of file path globs to include for specified group, e.g.,**/test/*;**.java. |
* Multi-value column: multiple values can be entered in this column using a semicolon ; as the separator.
Note that a file in a given repository should only be tagged to one group.
e.g.: example.java in example-repo can either be in the test group or the code group, but not in both test and code group. If multiple groups are specified for a given file, the latter group (i.e., code group) is set for the file.
report-config.json
You can optionally use report-config.json to customize report generation by providing the following information. (example)
Fields to provide:
title: Title of the generated report, which is also the title of the deployed dashboard. Default: "RepoSense Report"
config.json (standalone config file)
Repo owners can provide the following additional information to RepoSense using a config file that we call the standalone config file:
- which files/authors/commits to analyze/omit
- which git and GitHub usernames belong to which authors
- the display of an author
To use this feature, add a _reposense/config.json to the root of your repo using the format in the example below (another example) and commit it (reason: RepoSense can see committed code only):
{
  "ignoreGlobList": ["about-us/**", "**index.html"],
  "formats": ["html", "css"],
  "ignoreCommitList": ["90018e49f129ce7e0abdc8b18e91c9813588c601", "67890def", "abc123..def456"],
  "ignoreAuthorList": ["charlie"],
  "authors":
  [
    {
      "githubId": "alice",
      "emails": ["alice@example.com", "alicet@example.com"],
      "displayName": "Alice T.",
      "authorNames": ["AT", "A"],
      "ignoreGlobList": ["**.css"]
    },
    {
      "githubId": "bob"
    }
  ]
}
Note: all fields are optional unless specified otherwise.
Fields to provide repository-level info:
ignoreGlobList: Folders/files to ignore, specified using the glob format.formats: File formats to analyze. Default: all file formatsignoreCommitList: The list of commits to ignore during analysis. For accurate results, the commits should be provided with their full hash. Additionally, a range of commits can be specified using the..notation e.g.abc123..def456(both inclusive).ignoreAuthorList: The list of authors to ignore during analysis. Authors specified inauthorsfield orauthor-config.csvwill be also be omitted if they are in this list. Authors should be specified by their Git Author Name.
Fields to provide author-level info:
Note: authors field should contain all authors that should be captured in the analysis.
githubId: GitHub username of the author. mandatory field.emails: Associated GitHub emails of the author. This can be found in your GitHub settings.displayName: Name to display on the report for this author.authorNames: Git Author Name(s) used in the author's commits. By default, RepoSense assumes an author would use her GitHub username as the Git username too. The meaning of Git Author Name is explained in A note about git author name.ignoreGlobList: Additional (i.e. on top of the repo-levelignoreGlobList) folders/files to ignore for a specific author . In the example above, the actualignoreGlobListforalicewould be["about-us/**", "**index.html", "**.css"]
To verify your standalone configuration is as intended, add the _reposense/config.json to your local copy of repo and run RepoSense against it as follows:
- Format:
java -jar RepoSense.jar --repo LOCAL_REPO_LOCATION - Example:
java -jar RepoSense.jar --repo c:/myRepose/foo/bar
After that, view the report to see if the configuration you specified in the config file is being reflected correctly in the report.
A note about git author name
Git Author Name refers to the customizable author's display name set in the local .gitconfig file. For example, in the Git Log's display:
...
commit cd7f610e0becbdf331d5231887d8010a689f87c7
Author: ConfiguredAuthorName <author@example.com>
Date:   Fri Feb 9 19:14:41 2018 +0800

    Make some changes to show my new author's name

commit e3f699fd4ef128eebce98d5b4e5b3bb06a512f49
Author: ActualGitHubId <author@example.com>
Date:   Fri Feb 9 19:13:13 2018 +0800

    Initial commit
 ...
ActualGitHubId and ConfiguredAuthorName are both Git Author Name of the same author.
To find the author name that you are currently using for your current git repository, run the following command within your git repository:
git config user.name
To set the author name to the value you want (e.g., to set it to your GitHub username) for your current git repository, you can use the following command (more info):
git config user.name "YOUR_AUTHOR_NAME”
To set the author name to use a default value you want for future git repositories, you can use the following command:
git config --global user.name "YOUR_AUTHOR_NAME”
RepoSense expects the Git Author Name to be the same as author's GitHub username. If an author's Git Author Name is different from her GitHub ID, the Git Author Name needs to be specified in the standalone config file. If the author has more than one Git Author Name, multiple values can be entered too.
Note: Symbols such as ", !, / etc. in your author name will be omitted, which may reduce the accuracy of the analysis if 2 names in the repository are approximately similar.
Step 5 View the generated report:
To access your regenerated RepoSense report, go to the settings of your fork in GitHub, under GitHub Pages section, look for Your site is published at [LINK]. It should look something like https://[YOUR_GITHUB_ID].github.io/publish-RepoSense.
Updating the report
Manual:
- You can trigger GitHub to re-generate and re-deploy the report by pushing an empty commit to your fork.
- Currently, the GitHub Actions UI does not support the manual execution of workflows.
Automated: GitHub actions can be set to run periodically.
- Edit the
.github/workflows/main.ymland uncomment theschedule:section. - You may change the expression after
cron:to a schedule of your choice. Read more about cron syntax here. - Commit your changes.
Appendix: Using RepoSense with Travis
Appendix: RepoSense with Travis
You can use the CI tool Travis to automate generating and publishing of RepoSense reports.
Setting up
The instructions below assume you are using GitHub pages to host your report.
Step 1 Fork the publish-RepoSense repository using this link. Optionally, you can rename the fork to match your RepoSense report e.g., project-code-dashboard.
Step 2 Generate a personal access token or deploy key on GitHub as explained in the panel below.
Granting write access on GitHub
Granting write-access to a repository
We recommend using a personal access token if aiming for the ease of setup and deploy key if aiming for enhanced security.
If you wish to use personal access token:
- Create a personal access token by following this guide and give only
public_repopermission. - Copy the token for later use.
If you wish to use deploy key:
[Windows users] ssh-keygen and base64 are accessible using Git Bash.
- Create a public-private key pair (without a passphrase) using the
ssh-keygen.
i.e.,ssh-keygen -t ecdsa -b 521 -f id_reposense -q -N "" - Create a deploy key as follows:
- Go to the
settingspage of your publish-RepoSense fork - Click on the
Deploy keysitem in the navigation menu in that page - Click on the
Add deploy keybutton and create a new deploy key with the contents ofid_reposense.pub.
- Go to the
- Copy the private key in base64 encoded format for later use.
i.e.,cat id_reposense | base64 -w 0
Step 3 Login to Travis-CI. You may have to sign up first.
Step 4 Syncy your Travis account with GitHub:
- Go to your account.
- Click on
Sync accountto fetch all your repositories into Travis-CI.
Step 5 Activate the repository:
- Go to your publish-RepoSense fork in Travis-CI
- Under
Currenttab, click onActivate repository.
Step 6 Set the token/key:
- In the same page, click on
More optionson the right. - Then, click on the
Settingsoption:
- Under
Environment Variables, name a variable asGITHUB_TOKENorGITHUB_DEPLOY_KEYdepending on your earlier choice and paste the token/key into its value field; then clickAdd. - Ensure that the
Display value in build logisswitched offfor security reasons:
Step 7 Update the report configuration:
In your fork, edit run.sh (and if applicable, repo-config.csv, author-config.csv, group-config.csv) to customize the command line parameters or repositories to be analyzed.
Appendix: run.sh format
Appendix: run.sh format
run.sh is a script used for automating RepoSense report generation.
Customizing the RepoSense command
You can update the RepoSense command (i.e., the last line) in the run.sh to match your needs.
Appendix: CLI syntax reference
Appendix: CLI syntax reference
The command java -jar RepoSense.jar takes several flags.
Examples:
An example of a command using most parameters:
java -jar RepoSense.jar --repos https://github.com/reposense/RepoSense.git --output ./report_folder --since 31/1/2017 --until 31/12/2018 --formats java adoc xml --view --ignore-standalone-config --last-modified-date --timezone UTC+08
Same command as above but using most parameters in alias format:
java -jar RepoSense.jar -r https://github.com/reposense/RepoSense.git -o ./report_folder -s 31/1/2017 -u 31/12/2018 -f java adoc xml -v -i -l -t UTC+08
The section below provides explanations for each of the flags.
--assets, -a
--assets ASSETS_DIRECTORY: Specifies where to place assets for report generation.
- Parameter:
ASSETS_DIRECTORYThe directory containing the assets files. Afavicon.icofile can be placed here to customize the favicon of the dashboard. - Alias:
-a - Example:
--assets ./assetsor-a ./assets
- If
--assetsis not specified, RepoSense looks for assets in the./assetsdirectory.
--config, -c
--config CONFIG_DIRECTORY: Specifies that config files located in CONFIG_DIRECTORY should be used to customize the report.
- Parameter:
CONFIG_DIRECTORYThe directory containing the config files. Should contain arepo-config.csvfile. Optionally, can contain anauthor-config.csvfile or/and agroup-config.csvfile or/and areport-config.jsonfile. - Alias:
-c - Example:
java -jar RepoSense.jar --config ./config
- Cannot be used with
--repos. - If both
--reposand--configare not specified, RepoSense looks for config files in the./configdirectory.
--formats, -f
--formats LIST_OF_FORMATS: Specifies which file extensions to be included in the analysis.
- Parameter:
LIST_OF_FORMATSA space-separated list of file extensions that should be included in the analysis.
Default: all file formats - Alias:
-f - Example:
--formats css fxml gradleor-f css fxml gradle
--help, -h
--help: Shows the help message.
- Alias:
-h
Cannot be used with any other flags.
--ignore-standalone-config, -i
--ignore-standalone-config: Specifies that the standalone config file in the repo should be ignored.
- Default: the standalone config file is not ignored
- Alias:
-i - Example:
--ignore-standalone-configor-i
This flag overrides the Ignore standalone config field in the CSV config file.
--last-modified-date, -l
--last-modified-date: Specifies that the last modified date of each line of code should be added to authorship.json.
- Default: the last modified date of each line of code will not be added to
authorship.json - Alias:
-l(lowercase L) - Example:
--last-modified-dateor-l
The last modified dates will be in the same timezone specified with the --timezone flag.
--output, -o
--output OUTPUT_DIRECTORY: Indicates where to save the report generated.
- Parameter:
OUTPUT_DIRECTORYThe location for the generatedreposense-reportfolder.
Default: current directory - Alias:
-o - Example:
--output ./fooor-o ./foo(the report will be in the./foo/reposense-reportfolder)
--period, -p
--period PERIOD: Specifies the period of analysis window.
- Parameter:
PERIODThe period of analysis window, in the formatnd(for n days) ornw(for n weeks). It is used to calculate end date if only start date is specified, or calculate end date if only start date is specified. - Alias:
-p - Example:
--period 30dor--period 4w
- If both start date and end date are not specified, the date of generating the report will be taken as the end date.
- Cannot be used with both
--sinceand--until.
--repos, -r
--repos REPO_LOCATION: Specifies which repositories to analyze.
- Parameter:
REPO_LOCATIONA list of URLs or the disk location of the git repositories to analyze, separated by spaces. - Alias:
-r - Examples:
--repos https://github.com/reposense/RepoSense.git--repos https://github.com/reposense/RepoSense.git c:/myRepose/foo/bar: analyzes the two specified repos (one remote, one local) and generates one report containing details of both.
Cannot be used with --config.
--since, -s
--since START_DATE: Specifies the start date for the period to be analyzed.
- Parameter:
START_DATEThe first day of the period to be analyzed, in the formatDD/MM/YYYY.
Default: one month before the current date - Alias:
-s - Example:
--since 21/10/2017or-s 21/10/2017
- If the start date is not specified, only commits made one month before the end date (if specified) or the date of generating the report, will be captured and analyzed.
- If
d1is specified as the start date (--since d1or-s d1), then the earliest commit date of all repositories will be taken as the since date.
--timezone, -t
--timezone ZONE_ID: Indicates the timezone to be used for the analysis.
- Parameter:
ZONE_IDThe timezone in the formatZONE_ID[±hh[mm]].
Default: system's default timezone - Alias:
-t - Example:
--timezone UTC+08or-t UTC-1030
--until, -u
--until END_DATE: Specifies the end date of the analysis period.
- Parameter:
END_DATEThe last date of the period to be analyzed, in the formatDD/MM/YYYY.
Default: current date - Alias:
-u - Example:
--until 21/10/2017or-u 21/10/2017
Note: If the end date is not specified, the date of generating the report will be taken as the end date.
--version, -V
--version: Shows the version of RepoSense.
- Alias:
-V(upper case)
Cannot be used with any other flags.
--view, -v
--view [REPORT_FOLDER]: Specifies that the report should be opened in the default browser.
- Parameter:
REPORT_FOLDEROptional. If specified, no analysis will be performed and the report specified by the argument will be opened.
Default:./reposense-report - Alias:
-v - Example:
--viewor-v
Specifying which version of RepoSense to use
Depending on which version you wish to use for report generation, add one of the following flags to the line ./get-reposense.py in run.sh (e.g., ./get-reposense.py --release):
--release: Use the latest release (Stable)--master: Use the latest version of the master branch--tag TAGe.g.,--tag v1.6.1: use the version identified by the git tag given
Appendix: Config files format
Appendix: Config files format
Given below are the details of the various config files used by RepoSense.
RepoSense ignores the first row (i.e., column headings) of CSV config files. It is used simply to provide more information to human readers. This also means the columns in your config files should be in the exact order specified here.
A value in a config file is optional to provide unless it is specified as mandatory.
repo-config.csv
repo-config.csv file contains repo-level config data. Each row represents a repository's configuration (example).
| Column Name | Explanation |
|---|---|
| Repository's Location mandatory | The GitHub URL or Disk Path to the git repository e.g., https://github.com/foo/bar.git or C:\Users\user\Desktop\GitHub\foo\bar |
| Branch | The branch to analyze in the target repository, e.g., master. Default: the default branch of the repo |
| File formats*+ | The file extensions to analyze. Default: all file formats |
| Ignore Glob List*+ | The list of file path globs to ignore during analysis for each author, e.g., test/**;temp/** |
| Ignore standalone config | To ignore the standalone config file (if any) in the target repository, enter yes. If the cell is empty, the standalone config file in the repo (if any) will take precedence over configurations provided in the csv files. |
| Ignore Commit List*+ | The list of commits to ignore during analysis. For accurate results, the commits should be provided with their full hash. Additionally, a range of commits can be specified using the .. notation, e.g., abc123..def456 (both inclusive). |
| Ignore Authors List*+ | The list of authors to ignore during analysis. Authors should be specified by their Git Author Name. |
* Multi-value column: multiple values can be entered in this column using a semicolon ; as the separator.
+ Overrideable column: prepend with override: to use entered value(s) instead of value(s) from standalone config.
When using standalone config (if it is not ignored), it is possible to override specific values from the standalone config by prepending the entered value with override:.
author-config.csv
Optionally, you can use an author-config.csv (which should be in the same directory as the repo-config.csv file) to provide more details about the authors to analyze (example). It should contain the following columns:
| Column Name | Explanation |
|---|---|
| Repository's Location | Same as repo-config.csv. Default: all the repos in repo-config.csv |
| Branch | The branch to analyze for this author, e.g., master. Default: the author will be bound to all the repos in repo-config.csv that has the same repo's location, regardless of branch. |
| Author's GitHub ID mandatory | GitHub username of the target author, e.g., JohnDoe |
| Author's Emails* | Associated Github emails of the author. This can be found in your GitHub settings. |
| Author's Display Name | The name to display for the author. Default: author's GitHub username. |
| Author's Git Author Name* | The meaning of Git Author Name is explained in A note about git author name. |
| Ignore Glob List* | Files to ignore for this author, in addition to files ignored by the patterns specified in repo-config.csv |
* Multi-value column: multiple values can be entered in this column using a semicolon ; as the separator.
If author-config.csv is not given and the repo has not provided author details in a standalone config file, all the authors of the repositories within the date range specified (if any) will be analyzed.
group-config.csv
Optionally, you can provide a group-config.csv(which should be in the same directory as repo-config.csv file) to provide details on any custom groupings for files in specified repositories (example). It should contain the following columns:
| Column Name | Explanation |
|---|---|
| Repository's Location | Same as repo-config.csv. Default: all the repos in repo-config.csv |
| Group Name mandatory | Name of the group, e.g.,test. |
| Globs * mandatory | The list of file path globs to include for specified group, e.g.,**/test/*;**.java. |
* Multi-value column: multiple values can be entered in this column using a semicolon ; as the separator.
Note that a file in a given repository should only be tagged to one group.
e.g.: example.java in example-repo can either be in the test group or the code group, but not in both test and code group. If multiple groups are specified for a given file, the latter group (i.e., code group) is set for the file.
report-config.json
You can optionally use report-config.json to customize report generation by providing the following information. (example)
Fields to provide:
title: Title of the generated report, which is also the title of the deployed dashboard. Default: "RepoSense Report"
config.json (standalone config file)
Repo owners can provide the following additional information to RepoSense using a config file that we call the standalone config file:
- which files/authors/commits to analyze/omit
- which git and GitHub usernames belong to which authors
- the display of an author
To use this feature, add a _reposense/config.json to the root of your repo using the format in the example below (another example) and commit it (reason: RepoSense can see committed code only):
{
  "ignoreGlobList": ["about-us/**", "**index.html"],
  "formats": ["html", "css"],
  "ignoreCommitList": ["90018e49f129ce7e0abdc8b18e91c9813588c601", "67890def", "abc123..def456"],
  "ignoreAuthorList": ["charlie"],
  "authors":
  [
    {
      "githubId": "alice",
      "emails": ["alice@example.com", "alicet@example.com"],
      "displayName": "Alice T.",
      "authorNames": ["AT", "A"],
      "ignoreGlobList": ["**.css"]
    },
    {
      "githubId": "bob"
    }
  ]
}
Note: all fields are optional unless specified otherwise.
Fields to provide repository-level info:
ignoreGlobList: Folders/files to ignore, specified using the glob format.formats: File formats to analyze. Default: all file formatsignoreCommitList: The list of commits to ignore during analysis. For accurate results, the commits should be provided with their full hash. Additionally, a range of commits can be specified using the..notation e.g.abc123..def456(both inclusive).ignoreAuthorList: The list of authors to ignore during analysis. Authors specified inauthorsfield orauthor-config.csvwill be also be omitted if they are in this list. Authors should be specified by their Git Author Name.
Fields to provide author-level info:
Note: authors field should contain all authors that should be captured in the analysis.
githubId: GitHub username of the author. mandatory field.emails: Associated GitHub emails of the author. This can be found in your GitHub settings.displayName: Name to display on the report for this author.authorNames: Git Author Name(s) used in the author's commits. By default, RepoSense assumes an author would use her GitHub username as the Git username too. The meaning of Git Author Name is explained in A note about git author name.ignoreGlobList: Additional (i.e. on top of the repo-levelignoreGlobList) folders/files to ignore for a specific author . In the example above, the actualignoreGlobListforalicewould be["about-us/**", "**index.html", "**.css"]
To verify your standalone configuration is as intended, add the _reposense/config.json to your local copy of repo and run RepoSense against it as follows:
- Format:
java -jar RepoSense.jar --repo LOCAL_REPO_LOCATION - Example:
java -jar RepoSense.jar --repo c:/myRepose/foo/bar
After that, view the report to see if the configuration you specified in the config file is being reflected correctly in the report.
A note about git author name
Git Author Name refers to the customizable author's display name set in the local .gitconfig file. For example, in the Git Log's display:
...
commit cd7f610e0becbdf331d5231887d8010a689f87c7
Author: ConfiguredAuthorName <author@example.com>
Date:   Fri Feb 9 19:14:41 2018 +0800

    Make some changes to show my new author's name

commit e3f699fd4ef128eebce98d5b4e5b3bb06a512f49
Author: ActualGitHubId <author@example.com>
Date:   Fri Feb 9 19:13:13 2018 +0800

    Initial commit
 ...
ActualGitHubId and ConfiguredAuthorName are both Git Author Name of the same author.
To find the author name that you are currently using for your current git repository, run the following command within your git repository:
git config user.name
To set the author name to the value you want (e.g., to set it to your GitHub username) for your current git repository, you can use the following command (more info):
git config user.name "YOUR_AUTHOR_NAME”
To set the author name to use a default value you want for future git repositories, you can use the following command:
git config --global user.name "YOUR_AUTHOR_NAME”
RepoSense expects the Git Author Name to be the same as author's GitHub username. If an author's Git Author Name is different from her GitHub ID, the Git Author Name needs to be specified in the standalone config file. If the author has more than one Git Author Name, multiple values can be entered too.
Note: Symbols such as ", !, / etc. in your author name will be omitted, which may reduce the accuracy of the analysis if 2 names in the repository are approximately similar.
Step 8 View the generated report:
- Go to the
Settingspage of your fork in GitHub. - Under the
GitHub Pagessection, look forYour site is published at [LINK]. It should look something likehttps://[YOUR_GITHUB_ID].github.io/publish-RepoSense.
It takes a few minutes for report generation. Meanwhile, you can monitor the progress live at Travis-CI's Builds.
Updating the report
Manual: Travis UI has a way for you to trigger a build, using which you can cause the report to be updated.
- Go to your fork in Travis-CI, click on
More optionson the right thenTrigger build. - In the pop up, click
Trigger custom build.
Automated: Travis-CI offers Cron Jobs in intervals of daily, weekly or monthly.
- Login to Travis-CI.
- Go to your fork in Travis-CI, click on
More optionson the right then accessSettings. - Under
Cron Jobs, choosemasterforBranch,Always runforOptionsand pick anIntervalof your choice; then clickAdd.
Appendix: Using RepoSense with Netlify
Appendix: RepoSense with Netlify
Note that Netlify has a low limit for free tier users (only 300 build minutes per month as at June 2020 -- a single report generation can take 2-3 build minutes, longer if your report includes many/big repositories).
Setting up
Step 1 Fork the publish-RepoSense repository using this link. Optionally, you can rename the fork to match your RepoSense report e.g., project-code-dashboard.
Step 2 Set up Netlify for your fork as described in this guide.
You will need to use the following in Step 5: Configure Your Settings of that guide:
- build command:
pip install requests && ./run.sh - publish directory:
./reposense-report
After Netlify finishes building the site, you should be able to see a dummy report at the URL of your Netlify site.
Step 3 Generate the report you want by updating the settings in your fork.
- Go to the
run.shfile of your fork (on GitHub). - Update the last line (i.e., the command for running RepoSense) to match the report you want to generate:
java -jar RepoSense.jar --repos FULL_REPO_URL(assuming you want to generate a default report for just one repo)
e.g.,java -jar RepoSense.jar --repos https://github.com/reposense/RepoSense.git(note the .git at the end of the repo URL) - Commit the file. This will trigger Netlify to rebuild the report.
- Go to the URL of your Netlify site to see the updated RepoSense report (it might take about 2-5 minutes for Netlify to generate the report).
PR previews
After setting up Netlify for your repo containing RepoSense settings, when a PR comes in to that repo to update any setting, you can scroll down the PR page and in All checks have passed, click on the Details beside deploy/netlify — Deploy preview ready! to see a preview of the report as per the changes in the PR.
Updating the report
Manual: Netlify UI has a way for you to trigger a build, using which you can cause the report to be updated.
Automated: Netlify's can be set up to update the report whenever a target repo of your report is updated, provided you are able to update the target repos in a certain way.
-
Click on Settings in the top, choose Build & deploy from the left panel and scroll to Build hooks.
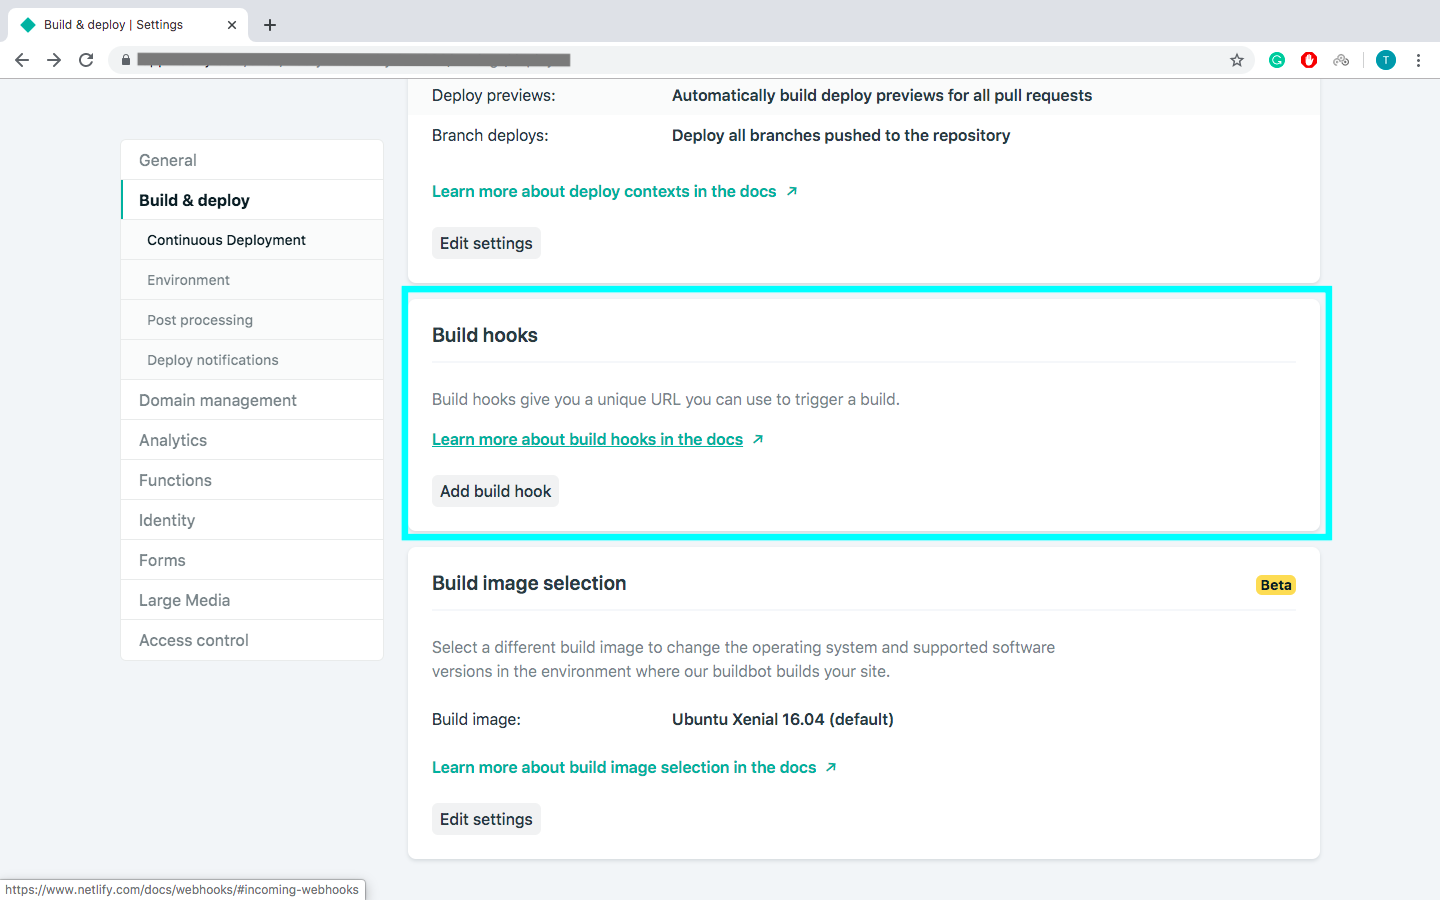
-
Click Add build hook, give your webhook a name, and choose the
masterbranch to build. A Netlify URL will be generated. -
Go to your target repository (the repository you want to analyze) and click on Settings.
-
Select Webhooks on left panel and click on Add webhook.
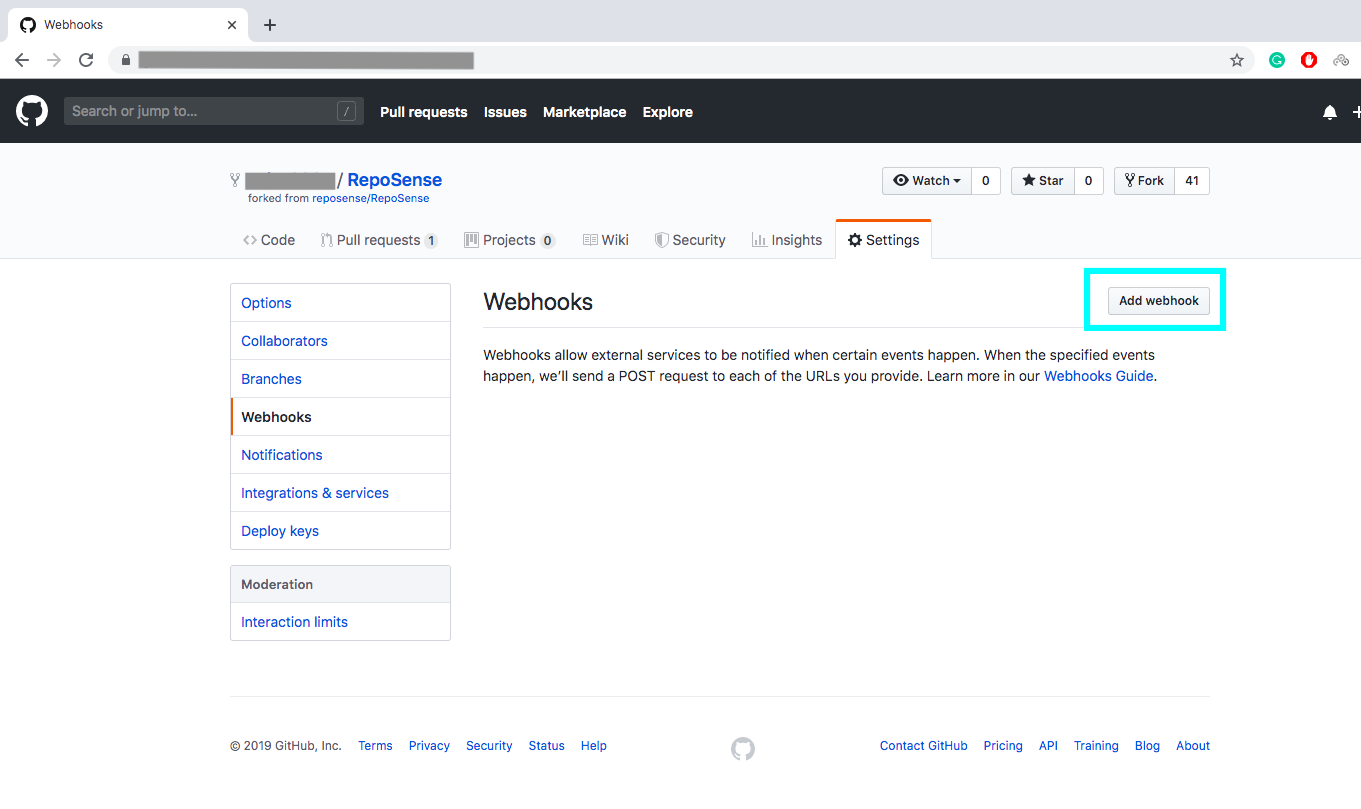
-
Copy the Netlify URL and paste it in the URL form field.
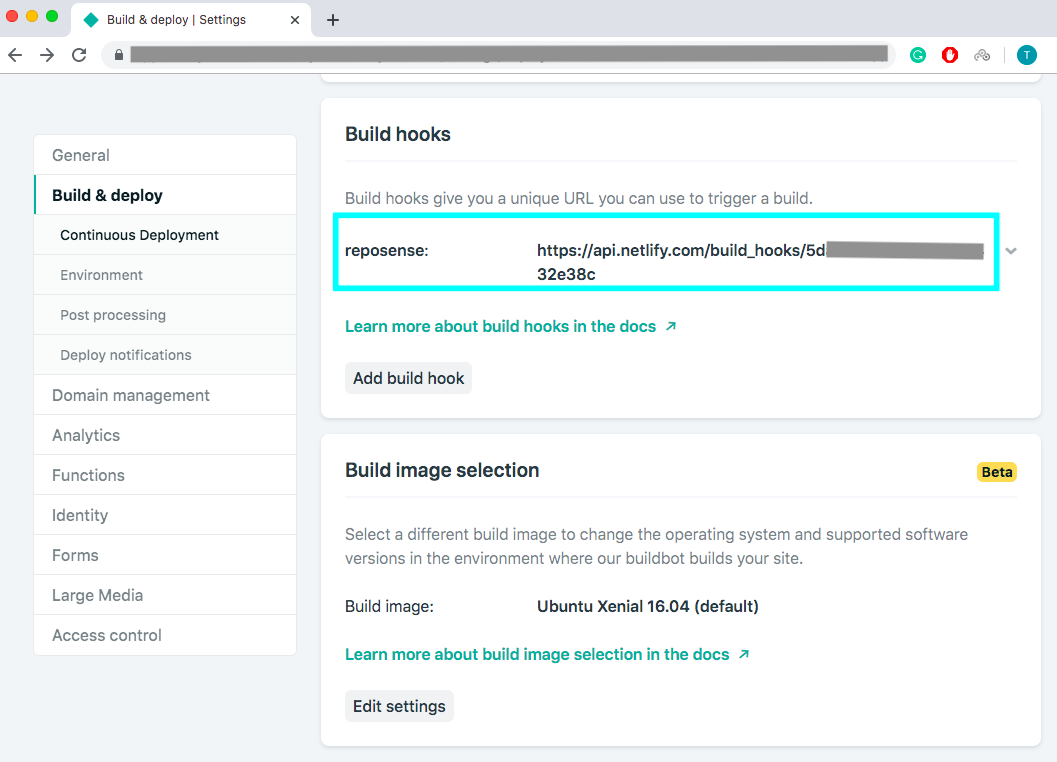
Note: Although the build url is not that secretive, it should be kept safe to prevent any misuse.
-
Select application.json as content type.
-
Select Let me select individual events and based on your requirements check the checkboxes.
-
Leave the Active checkbox checked.
-
Click on Add webhook to save the webhook and add it.
If you encounter problems at any step, you can refer to our FAQ, the troubleshooting guide, or post in our issue tracker.
Appendix: FAQ
Appendix: FAQ
Q: Does RepoSense work on private repositories?
A: RepoSense will first clone the git repository to be analyzed; thus, if you do not have access to the repository, we cannot run the analysis.
To enable RepoSense to work on private repositories, ensure that you have enabled access to your private repository in your git terminal first before running the analysis.
Q: How do formats work?
A: Formats are the file extensions, which is the suffix at the end of a filename that indicates what type of file it is.
The formats/file extensions to be analyzed by RepoSense can be specified through the standalone config file, repo-config file, and command line.
Q: How does ignore glob list work?
A: Glob is the pattern to specify a set of filenames with wildcard characters. Ignore glob list is the list of patterns to specify all the files in the repository which should be ignored from analysis.
The ignore glob list can be specified through the standalone config file, repo-config file, and author-config file.
Appendix: Troubleshooting guide
Appendix: Troubleshooting
Contributions missing in the ramp chart (but appear in the contribution bar and code panel)
This is probably a case of giving an incorrect author name alias (or GitHub ID) in your author-config file.
Please refer to A Note About Git Author Name above on how to find out the correct author name you are using and how to change it.
Also, ensure that you have added all author name aliases you may be using (if you are using multiple computers or have previously changed your author name).
Alternatively, you may choose to configure RepoSense to track using your GitHub email instead of in your standalone config file or author-config file, which is more accurate compared to author name aliases. The associated GitHub email you are using can be found in your GitHub settings.
Contribution bar and code panel is empty (despite a non-empty ramp chart)
The contribution bar and code panel records the lines you have authored to the latest commit of the repository and branch you are analyzing. As such, it is possible that while you have lots of committed contributions, your final authorship contribution is low. This happens if you have only deleted lines or someone else has overwritten your code and taken authorship for it (currently, RepoSense does not have the functionality to track overwritten lines)..
It is also possible that another user has overridden the authorship of your lines using the @@author tags.
RepoSense is not using the standalone config file in my local repository
Ensure that you have committed the changes to your standalone config file first before running the analysis, as RepoSense is unable to detect uncommitted changes to your local repository.
RepoSense fails on Windows (but works on Linux/Mac OS)
Possibly, you may have some file names with special characters in them, which is disallowed in Windows OS. As such, RepoSense is unable to clone your repository fully, thus failing the analysis.
Some files are not captured by RepoSense
The files may be binary files. RepoSense does not analyze binary files. Common binary files include images (.jpg, .png), applications (.exe), zip files (.zip, .rar) and certain document types (.docx, .pptx).