You are looking at the user documentation for the most recent master branch of RepoSense (not released to the public yet).
The documentation for the latest public release is here.
Customizing reports
The report can be customized using several ways, as explained below.
Customize using CLI flags
The simplest approach is to provide additional flags when running RepoSense. The various flags are given in the panel below.
Appendix: CLI syntax reference
Appendix: CLI syntax reference
The command java -jar RepoSense.jar takes several flags.
Examples:
An example of a command using most parameters:
java -jar RepoSense.jar --repos https://github.com/reposense/RepoSense.git --output ./report_folder --since 31/1/2017 --until 31/12/2018 --formats java adoc xml --view --ignore-standalone-config --last-modified-date --timezone UTC+08
Same command as above but using most parameters in alias format:
java -jar RepoSense.jar -r https://github.com/reposense/RepoSense.git -o ./report_folder -s 31/1/2017 -u 31/12/2018 -f java adoc xml -v -i -l -t UTC+08
The section below provides explanations for each of the flags.
--assets, -a
--assets ASSETS_DIRECTORY: Specifies where to place assets for report generation.
- Parameter:
ASSETS_DIRECTORYThe directory containing the assets files. Afavicon.icofile can be placed here to customize the favicon of the dashboard. - Alias:
-a - Example:
--assets ./assetsor-a ./assets
- If
--assetsis not specified, RepoSense looks for assets in the./assetsdirectory.
--config, -c
--config CONFIG_DIRECTORY: Specifies that config files located in CONFIG_DIRECTORY should be used to customize the report.
- Parameter:
CONFIG_DIRECTORYThe directory containing the config files. Should contain arepo-config.csvfile. Optionally, can contain anauthor-config.csvfile or/and agroup-config.csvfile or/and areport-config.jsonfile. - Alias:
-c - Example:
java -jar RepoSense.jar --config ./config
- Cannot be used with
--repos. - If both
--reposand--configare not specified, RepoSense looks for config files in the./configdirectory.
--formats, -f
--formats LIST_OF_FORMATS: Specifies which file extensions to be included in the analysis.
- Parameter:
LIST_OF_FORMATSA space-separated list of file extensions that should be included in the analysis.
Default: all file formats - Alias:
-f - Example:
--formats css fxml gradleor-f css fxml gradle
--help, -h
--help: Shows the help message.
- Alias:
-h
Cannot be used with any other flags.
--ignore-standalone-config, -i
--ignore-standalone-config: Specifies that the standalone config file in the repo should be ignored.
- Default: the standalone config file is not ignored
- Alias:
-i - Example:
--ignore-standalone-configor-i
This flag overrides the Ignore standalone config field in the CSV config file.
--last-modified-date, -l
--last-modified-date: Specifies that the last modified date of each line of code should be added to authorship.json.
- Default: the last modified date of each line of code will not be added to
authorship.json - Alias:
-l(lowercase L) - Example:
--last-modified-dateor-l
The last modified dates will be in the same timezone specified with the --timezone flag.
--output, -o
--output OUTPUT_DIRECTORY: Indicates where to save the report generated.
- Parameter:
OUTPUT_DIRECTORYThe location for the generatedreposense-reportfolder.
Default: current directory - Alias:
-o - Example:
--output ./fooor-o ./foo(the report will be in the./foo/reposense-reportfolder)
--period, -p
--period PERIOD: Specifies the period of analysis window.
- Parameter:
PERIODThe period of analysis window, in the formatnd(for n days) ornw(for n weeks). It is used to calculate end date if only start date is specified, or calculate end date if only start date is specified. - Alias:
-p - Example:
--period 30dor--period 4w
- If both start date and end date are not specified, the date of generating the report will be taken as the end date.
- Cannot be used with both
--sinceand--until.
--repos, -r
--repos REPO_LOCATION: Specifies which repositories to analyze.
- Parameter:
REPO_LOCATIONA list of URLs or the disk location of the git repositories to analyze, separated by spaces. - Alias:
-r - Examples:
--repos https://github.com/reposense/RepoSense.git--repos https://github.com/reposense/RepoSense.git c:/myRepose/foo/bar: analyzes the two specified repos (one remote, one local) and generates one report containing details of both.
Cannot be used with --config.
--since, -s
--since START_DATE: Specifies the start date for the period to be analyzed.
- Parameter:
START_DATEThe first day of the period to be analyzed, in the formatDD/MM/YYYY.
Default: one month before the current date - Alias:
-s - Example:
--since 21/10/2017or-s 21/10/2017
- If the start date is not specified, only commits made one month before the end date (if specified) or the date of generating the report, will be captured and analyzed.
- If
d1is specified as the start date (--since d1or-s d1), then the earliest commit date of all repositories will be taken as the since date.
--timezone, -t
--timezone ZONE_ID: Indicates the timezone to be used for the analysis.
- Parameter:
ZONE_IDThe timezone in the formatZONE_ID[±hh[mm]].
Default: system's default timezone - Alias:
-t - Example:
--timezone UTC+08or-t UTC-1030
--until, -u
--until END_DATE: Specifies the end date of the analysis period.
- Parameter:
END_DATEThe last date of the period to be analyzed, in the formatDD/MM/YYYY.
Default: current date - Alias:
-u - Example:
--until 21/10/2017or-u 21/10/2017
Note: If the end date is not specified, the date of generating the report will be taken as the end date.
--version, -V
--version: Shows the version of RepoSense.
- Alias:
-V(upper case)
Cannot be used with any other flags.
--view, -v
--view [REPORT_FOLDER]: Specifies that the report should be opened in the default browser.
- Parameter:
REPORT_FOLDEROptional. If specified, no analysis will be performed and the report specified by the argument will be opened.
Default:./reposense-report - Alias:
-v - Example:
--viewor-v
Customize using CSV config files
Another, more powerful, way to customize the report is by using dedicated config files. In this case you need to use the --config flag instead of the --repo flag when running RepoSense, as follows:
Appendix: CLI syntax reference → config flag
--assets ASSETS_DIRECTORY: Specifies where to place assets for report generation.
- Parameter:
ASSETS_DIRECTORYThe directory containing the assets files. Afavicon.icofile can be placed here to customize the favicon of the dashboard. - Alias:
-a - Example:
--assets ./assetsor-a ./assets
- If
--assetsis not specified, RepoSense looks for assets in the./assetsdirectory.
Managing config files collaboratively: If you use RepoSense to monitor a large number of programmers, it may be more practical to get the programmers to submit PRs to update the config files as necessary (a coder realizes some of her code is missing from the report because she used multiple git usernames, and wants to add the additional usernames to the config fileexample use case).
To ensure that their PRs are correct, you can use Netlify deploy previews to preview how the report would look like after the PR has been merged. More details are in the panels below.
Appendix: Using RepoSense with Netlify → Setting up
Note that Netlify has a low limit for free tier users (only 300 build minutes per month as at June 2020 -- a single report generation can take 2-3 build minutes, longer if your report includes many/big repositories).
Setting up
Step 1 Fork the publish-RepoSense repository using this link. Optionally, you can rename the fork to match your RepoSense report e.g., project-code-dashboard.
Step 2 Set up Netlify for your fork as described in this guide.
You will need to use the following in Step 5: Configure Your Settings of that guide:
- build command:
pip install requests && ./run.sh - publish directory:
./reposense-report
After Netlify finishes building the site, you should be able to see a dummy report at the URL of your Netlify site.
Step 3 Generate the report you want by updating the settings in your fork.
- Go to the
run.shfile of your fork (on GitHub). - Update the last line (i.e., the command for running RepoSense) to match the report you want to generate:
java -jar RepoSense.jar --repos FULL_REPO_URL(assuming you want to generate a default report for just one repo)
e.g.,java -jar RepoSense.jar --repos https://github.com/reposense/RepoSense.git(note the .git at the end of the repo URL) - Commit the file. This will trigger Netlify to rebuild the report.
- Go to the URL of your Netlify site to see the updated RepoSense report (it might take about 2-5 minutes for Netlify to generate the report).
Appendix: Using RepoSense with Netlify → PR previews
PR previews
After setting up Netlify for your repo containing RepoSense settings, when a PR comes in to that repo to update any setting, you can scroll down the PR page and in All checks have passed, click on the Details beside deploy/netlify — Deploy preview ready! to see a preview of the report as per the changes in the PR.

Get target repos to provide more info
If feasible, you can also customize the target repos to play well with RepoSense in the following two ways:
1. Add a stand-alone config file to the repo to provide more config details to RepoSense. The format of the file is given below.
Appendix: Standalone config file format
config.json (standalone config file)
Repo owners can provide the following additional information to RepoSense using a config file that we call the standalone config file:
- which files/authors/commits to analyze/omit
- which git and GitHub usernames belong to which authors
- the display of an author
To use this feature, add a _reposense/config.json to the root of your repo using the format in the example below (another example) and commit it (reason: RepoSense can see committed code only):
{
  "ignoreGlobList": ["about-us/**", "**index.html"],
  "formats": ["html", "css"],
  "ignoreCommitList": ["90018e49f129ce7e0abdc8b18e91c9813588c601", "67890def", "abc123..def456"],
  "ignoreAuthorList": ["charlie"],
  "authors":
  [
    {
      "githubId": "alice",
      "emails": ["alice@example.com", "alicet@example.com"],
      "displayName": "Alice T.",
      "authorNames": ["AT", "A"],
      "ignoreGlobList": ["**.css"]
    },
    {
      "githubId": "bob"
    }
  ]
}
Note: all fields are optional unless specified otherwise.
Fields to provide repository-level info:
ignoreGlobList: Folders/files to ignore, specified using the glob format.formats: File formats to analyze. Default: all file formatsignoreCommitList: The list of commits to ignore during analysis. For accurate results, the commits should be provided with their full hash. Additionally, a range of commits can be specified using the..notation e.g.abc123..def456(both inclusive).ignoreAuthorList: The list of authors to ignore during analysis. Authors specified inauthorsfield orauthor-config.csvwill be also be omitted if they are in this list. Authors should be specified by their Git Author Name.
Fields to provide author-level info:
Note: authors field should contain all authors that should be captured in the analysis.
githubId: GitHub username of the author. mandatory field.emails: Associated GitHub emails of the author. This can be found in your GitHub settings.displayName: Name to display on the report for this author.authorNames: Git Author Name(s) used in the author's commits. By default, RepoSense assumes an author would use her GitHub username as the Git username too. The meaning of Git Author Name is explained in A note about git author name.ignoreGlobList: Additional (i.e. on top of the repo-levelignoreGlobList) folders/files to ignore for a specific author . In the example above, the actualignoreGlobListforalicewould be["about-us/**", "**index.html", "**.css"]
To verify your standalone configuration is as intended, add the _reposense/config.json to your local copy of repo and run RepoSense against it as follows:
- Format:
java -jar RepoSense.jar --repo LOCAL_REPO_LOCATION - Example:
java -jar RepoSense.jar --repo c:/myRepose/foo/bar
After that, view the report to see if the configuration you specified in the config file is being reflected correctly in the report.
A note about git author name
Git Author Name refers to the customizable author's display name set in the local .gitconfig file. For example, in the Git Log's display:
...
commit cd7f610e0becbdf331d5231887d8010a689f87c7
Author: ConfiguredAuthorName <author@example.com>
Date:   Fri Feb 9 19:14:41 2018 +0800

    Make some changes to show my new author's name

commit e3f699fd4ef128eebce98d5b4e5b3bb06a512f49
Author: ActualGitHubId <author@example.com>
Date:   Fri Feb 9 19:13:13 2018 +0800

    Initial commit
 ...
ActualGitHubId and ConfiguredAuthorName are both Git Author Name of the same author.
To find the author name that you are currently using for your current git repository, run the following command within your git repository:
git config user.name
To set the author name to the value you want (e.g., to set it to your GitHub username) for your current git repository, you can use the following command (more info):
git config user.name "YOUR_AUTHOR_NAME”
To set the author name to use a default value you want for future git repositories, you can use the following command:
git config --global user.name "YOUR_AUTHOR_NAME”
RepoSense expects the Git Author Name to be the same as author's GitHub username. If an author's Git Author Name is different from her GitHub ID, the Git Author Name needs to be specified in the standalone config file. If the author has more than one Git Author Name, multiple values can be entered too.
Note: Symbols such as ", !, / etc. in your author name will be omitted, which may reduce the accuracy of the analysis if 2 names in the repository are approximately similar.
2. To have more precise control over which code segment is attributed to which author, authors can annotate their code using @@author tags, as explained below.
Appendix: Using @@author tags
Appendix: Using @@author tags
@@author tags is a rather invasive but sometimes necessary way to provide more information to RepoSense, by annotating the code being analyzed.
If you want to override the code authorship deduced by RepoSense (which is based on Git blame/log data), you can use @@author tags to specify certain code segments that should be credited to a certain author irrespective of git history. An example scenario where this is useful is when a method was originally written by one author but a second author did some minor refactoring to it; in this case, RepoSense might attribute the code to the second author while you may want to attribute the code to the first author.
There are 2 types of @@author tags:
- Start Tags (format:
@@author AUTHOR_GITHUB_ID): A start tag indicates the start of a code segment written by the author identified by theAUTHOR_GITHUB_ID. - End Tags (format:
@@author): Optional. An end tag indicates the end of a code segment written by the author identified by theAUTHOR_GITHUB_IDof the start tag.
If an end tag is not provided, the code till the next start tag (or the end of the file) will be attributed to the author specified in the start tag above. Use only when necessary to minimize polluting your code with these extra tags.
The @@author tags should be enclosed within a comment, using the comment syntax of the file in concern. Below are some examples:
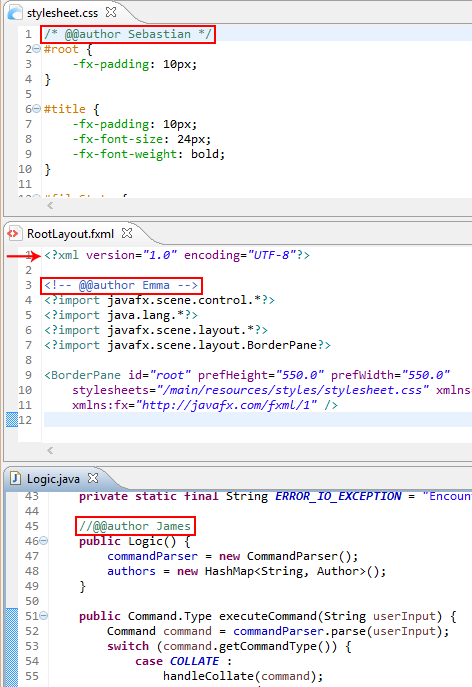
Note: Remember to commit the files after the changes. (reason: RepoSense can see committed code only)
Special thanks to Collate project for providing the inspiration for this functionality.